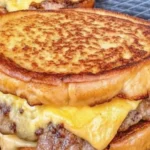
There’s something beautifully nostalgic about a grilled cheese sandwich, especially when it’s elevated by the juicy goodness of a Smashburger. This delightful twist unites two classic comforts — the oozy cheesiness of a grilled cheese and the satisfying heartiness of a burger. With each bite, you’re treated to melting American and Havarti cheeses, savory smashed beef, and a zippy dollop of Smashburger sauce that dances on your taste buds. Whenever I whip this up for my family, laughter fills the kitchen, and we’re instantly transported to sunny picnics and backyard barbecues. Trust me, this is not just food; it’s an experience that brings everyone together.
Recipe Timing
- Prep Duration: 15 minutes
- Active Cooking: 20 minutes
- Total Duration: 35 minutes
- Portion Size: Serves 4
- Complexity: Simple
Nutritional Recipe
- Calories per portion: Approximately 740
- Protein: 42 grams
- Carbs: 48 grams
- Fats: 44 grams
- Fiber: 1 gram
- Sugars: 3 grams
- Sodium: 1320 mg
Why You’ll Love This Smashburger Grilled Cheese
Imagine crispy, buttery bread toasty to golden perfection, giving way to layers of melted cheese that envelop perfectly charred beef. The Smashburger sauce offers a creamy, tangy kick that elevates each bite. Dill pickle chips provide a bright crunch, harmonizing the rich flavors in a way that is downright addictive. This Smashburger Grilled Cheese is perfect for cozy nights in or casual gatherings with friends. Serve it with a side of fries or a simple salad, and you’ve got a meal that will please both the young and the young at heart.
The Complete Cooking Journey
Let’s embark on this culinary adventure! With an enticing aroma enveloping the kitchen and a symphony of textures to savor, it’s time to create a dish that is as fun to make as it is to eat. Grab your apron, and let’s get cooking!
Ingredients:
- 1 lb Ground Beef
- 1 small Onion (thinly sliced)
- 1/2 cup Smashburger Sauce
- 8 slices Hearty White Bread
- 8 slices American Cheese
- 2 cups Havarti Cheese (shredded)
- 1/3 cup Sliced Dill Pickle Chips
- 2 tbsp Salted Butter
- Kosher Salt (to taste)
- Fresh Cracked Pepper (to taste)
Method:
Step 1: Sauté the Onions
In a skillet over medium heat, melt a tablespoon of butter and add the thinly sliced onions. Season with a sprinkle of kosher salt and fresh cracked pepper. Sauté them gently until they become soft and caramelized, about 8-10 minutes. The sweet aroma will start to fill your kitchen.
Step 2: Form the Beef Patties
While the onions are cooking, divide the ground beef into four equal portions. Form each portion into a loose ball, and season with salt and pepper. This is the best time to get those hands a little messy; squeezing them gently will help you achieve that perfect smashed burger.
Step 3: Smash and Cook the Beef
Once the onions are ready, move them to one side of the skillet. Increase the heat to high and place the beef balls onto the skillet. Using a spatula or a flat, sturdy tool, smash each ball down until flattened. Cook for about 3-4 minutes on one side until a crust forms, then flip and cook for another 3-4 minutes. Top each patty with slices of American and Havarti cheese, cover the skillet, and allow the cheese to melt beautifully.
Step 4: Prepare the Bread
Spread a thin layer of butter on one side of each slice of hearty white bread. This is the secret to achieving that golden, crispy crust we all crave.
Step 5: Assemble the Sandwich
On the unbuttered side, layer a slice of American cheese, a cheeseburger patty with melted cheeses, some sautéed onions, and dill pickle chips. Top with another slice of bread, buttered side facing out.
Step 6: Grill to Perfection
In the same skillet, reduce the heat to medium and place the assembled sandwich. Grill for 3-4 minutes on each side until golden brown and crispy. Press down gently with a spatula to ensure an even melt.
Step 7: Slice and Serve
Remove from the skillet and let the sandwich rest for a minute before slicing in half. Serve hot, and enjoy the savory eruption of flavors!
Serving Suggestions & Pairings
This Smashburger Grilled Cheese is a meal on its own, but pairing it with a simple side salad or crispy French fries can elevate your dining experience. A classic tomato soup also complements this sandwich perfectly, providing that comforting touch reminiscent of school lunches.
Storage & Leftovers Guide
Leftovers can be stored in an airtight container in the refrigerator for up to 3 days. To reheat, place in a skillet on low heat until warmed through, ensuring that the bread remains crispy.
Kitchen Wisdom & Success Tips
- For maximum cheese pull, use a mix of cheeses. Havarti melts wonderfully, while American adds that classic creaminess.
- Don’t be afraid to let your burgers get a good crust; it enhances the flavor significantly.
- Make it your own by adding toppings like bacon, jalapeños, or your choice of sauces.
Flavor Variations & Adaptations
Feel free to swap out the cheeses; sharp cheddar or pepper jack can offer delightful alternatives. You could also try adding some sautéed mushrooms or roasted peppers for a gourmet twist.
Reader Questions & Solutions
- What can I substitute for ground beef? Try ground turkey or a plant-based burger for a lighter option.
- How do I ensure my cheese melts perfectly? Cover the skillet while cooking, as steam helps with melting the cheese.
- Can I prepare this ahead of time? You can cook the beef and sauté the onions ahead; assemble and cook the sandwiches when you’re ready to serve.
- What bread works best? Hearty bread holds up well to the fillings, but feel free to use whole grain or even sourdough!
- Can I make it vegetarian? Absolutely! Swap the beef for a delicious veggie patty and enjoy all the same flavors!
Wrapping Up
Cooking is not just about sustenance; it’s about creating laughter, memories, and joy around the table. This Smashburger Grilled Cheese is your ticket to an unforgettable meal filled with delightful textures and flavors. Don’t hesitate to share your results, and remember, every bite is a step toward becoming the amazing cook you aspire to be. Now, grab your ingredients and let’s make some magic happen in the kitchen! Enjoy!
PrintSmashburger Grilled Cheese
A delightful twist on classic comfort food, this Smashburger Grilled Cheese unites the oozy cheesiness of a grilled cheese with the hearty satisfaction of a burger.
- Prep Time: 15 minutes
- Cook Time: 20 minutes
- Total Time: 35 minutes
- Yield: 4 servings 1x
- Category: Main Course
- Method: Grilling
- Cuisine: American
- Diet: Omnivore
Ingredients
- 1 lb Ground Beef
- 1 small Onion (thinly sliced)
- 1/2 cup Smashburger Sauce
- 8 slices Hearty White Bread
- 8 slices American Cheese
- 2 cups Havarti Cheese (shredded)
- 1/3 cup Sliced Dill Pickle Chips
- 2 tbsp Salted Butter
- Kosher Salt (to taste)
- Fresh Cracked Pepper (to taste)
Instructions
- Sauté the onions in a skillet over medium heat until soft and caramelized, about 8-10 minutes.
- Form the beef into four equal portions, season and shape into balls.
- Smash the beef balls in the skillet and cook for 3-4 minutes on each side with cheese on top to melt.
- Prepare bread by spreading butter on one side of each slice.
- Assemble the sandwich with cheese, beef patty, onions, and pickles on unbuttered sides.
- Grill the sandwich in the skillet until golden brown, 3-4 minutes on each side.
- Slice and serve hot.
Notes
Pair with a side of fries or a simple salad for a complete meal. Leftovers can be stored in the refrigerator for up to 3 days.
Nutrition
- Serving Size: 1 sandwich
- Calories: 740
- Sugar: 3g
- Sodium: 1320mg
- Fat: 44g
- Saturated Fat: 20g
- Unsaturated Fat: 18g
- Trans Fat: 0g
- Carbohydrates: 48g
- Fiber: 1g
- Protein: 42g
- Cholesterol: 100mg