
There’s something about a creamy cheesecake that brings back memories of family gatherings – the kind of gatherings where laughter, joy, and the sweet aroma of homemade treats swirl in the air. I fondly remember my grandmother’s kitchen, the heart of our family, where she would whip up desserts that not only delighted our taste buds but also nourished our souls. Among her many creations was a no-bake white chocolate cheesecake, a decadently smooth delight that always had us begging for seconds. Today, I want to share my take on this classic dessert, featuring a rich Oreo crust and adding a sprinkle of peppermint sweetness that’s perfect for the holiday season.
Recipe Timing
- Prep Duration: 20 minutes
- Active Cooking: 20 minutes
- Total Duration: 4 hours 20 minutes (includes refrigeration time)
- Portion Size: Serves 8-10
- Complexity: Simple
Nutritional Recipe
- Calories per portion: Approximately 350
- Protein: 4g
- Carbs: 30g
- Fats: 25g
- Fiber: 1g
- Sugars: 15g
- Sodium: 150mg
Why You’ll Love This No-Bake White Chocolate Cheesecake with Oreo Crust
This cheesecake is a showstopper in every sense – no oven required! The richness of cream cheese paired with the sweet notes of white chocolate offers a delightful experience in every bite. The Oreo crust adds a perfect crunch, making this dessert a wonderful balance of textures. Plus, with the refreshing touch of crushed peppermint bark on top, it’s an indulgent treat that feels festive and fun – ideal for any special occasion or to simply brighten your day.
The Complete Cooking Journey
Get ready to embark on a delicious journey that starts from a simple mix of crushed Oreos and butter and ends with a creamy cheesecake that’s a feast for the senses!
Ingredients:
- 1 1/2 cups crushed Oreo cookies
- 1/2 cup unsalted butter, melted
- 16 oz cream cheese, softened
- 1 cup white chocolate, melted
- 1/2 cup powdered sugar
- 1 tsp vanilla extract
- 1 cup heavy whipping cream
- Crushed peppermint bark for topping
Method:
Step 1: Prepare the Oreo Crust
In a medium bowl, combine crushed Oreo cookies and melted butter. Press the mixture firmly into the bottom of a 9-inch springform pan to form the crust. Make sure it’s evenly distributed and tightly packed to create a sturdy base for your cheesecake.
Step 2: Mix the Creamy Filling
In a large bowl, beat the softened cream cheese until smooth. Then add the melted white chocolate, powdered sugar, and vanilla extract. Mix until everything is well combined and creamy, inviting all those delicious flavors to come together.
Step 3: Whip the Cream
In a separate bowl, whip the heavy cream until stiff peaks form. This step is crucial for achieving that light, airy texture that beautifully contrasts with the dense filling.
Step 4: Combine the Mixtures
Gently fold the whipped cream into the cream cheese mixture until no streaks remain. This careful folding ensures the mixture stays light and fluffy – we want it to have that melt-in-your-mouth creaminess!
Step 5: Assemble the Cheesecake
Pour the luscious cheesecake filling over the prepared Oreo crust. Spread it evenly with a spatula, making sure every bit of that creamy goodness reaches the edges.
Step 6: Garnish and Chill
Top your creation with crushed peppermint bark for an extra festive feel. Now, refrigerate for at least 4 hours, or until set. This chilling time allows the flavors to meld beautifully. Serve your cheesecake chilled for the best taste!
Serving Suggestions & Pairings
This cheesecake pairs wonderfully with a hot cup of coffee or a rich hot chocolate. For an extra treat, serve with fresh berries, or a drizzle of dark chocolate sauce for a touch of elegance. It also makes a delightful ending to a holiday dinner or a casual get-together.
Storage & Leftovers Guide
Store any leftovers covered in the refrigerator for up to 3-4 days. This cheesecake holds up beautifully, but try to keep it covered to maintain its creamy texture and prevent any absorption of odors from the fridge.
Kitchen Wisdom & Success Tips
- Make sure your cream cheese is at room temperature; this will help it blend smoothly and seamlessly with the other ingredients.
- Don’t skip on the chilling; patience is key! A well-chilled cheesecake is much easier to slice and serves pleasantly cold.
Flavor Variations & Adaptations
Feel free to play with flavors! Instead of white chocolate, you can use milk or dark chocolate. For a fruity twist, fold in some raspberry or strawberry puree into the cream cheese mixture. Or, why not switch the Oreo crust for a graham cracker crust or a nut crust? The options are endless!
Reader Questions & Solutions
-
Q: My cheesecake didn’t set properly. What went wrong?
- A: Ensure you refrigerated it for at least 4 hours, or overnight for best results. The mixture should be well-folded and the heavy cream whipped to stiff peaks.
-
Q: Can I use different types of chocolate?
- A: Absolutely! Milk or dark chocolate would work beautifully, just adjust sugar to taste.
-
Q: Can I use a pie dish instead of a springform pan?
- A: Yes, but it might be trickier to slice without a removable base. Just ensure you line the pie dish with parchment paper if possible.
-
Q: How do you prevent the crust from getting soggy?
- A: Allow the crust to harden in the fridge for at least 30 minutes before adding the filling. The butter helps to bind it together.
-
Q: Is there a dairy-free option for this cheesecake?
- A: Yes! Use dairy-free cream cheese, vegan white chocolate, and coconut cream for whipping.
Wrapping Up
Whether you’re making this no-bake white chocolate cheesecake for a special event or just because you feel like treating yourself, it’s bound to be a hit! Easy to make and deliciously indulgent, this recipe holds a special place in my heart. I hope it brings joy and sweet memories to your table, just as it has done for mine. Now, roll up your sleeves, gather your ingredients, and get ready to create a cheesecake that will impress everyone who gets a slice! Happy baking!
PrintNo-Bake White Chocolate Cheesecake with Oreo Crust
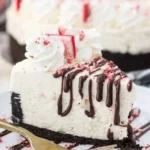
A creamy no-bake cheesecake featuring a rich Oreo crust, smooth white chocolate filling, and a festive touch of crushed peppermint bark.
- Prep Time: 20 minutes
- Cook Time: 20 minutes
- Total Time: 260 minutes
- Yield: 8-10 servings 1x
- Category: Dessert
- Method: No-Bake
- Cuisine: American
- Diet: Vegetarian
Ingredients
- 1 1/2 cups crushed Oreo cookies
- 1/2 cup unsalted butter, melted
- 16 oz cream cheese, softened
- 1 cup white chocolate, melted
- 1/2 cup powdered sugar
- 1 tsp vanilla extract
- 1 cup heavy whipping cream
- Crushed peppermint bark for topping
Instructions
- Prepare the Oreo Crust: In a medium bowl, combine crushed Oreo cookies and melted butter. Press the mixture firmly into the bottom of a 9-inch springform pan to form the crust.
- Mix the Creamy Filling: In a large bowl, beat the softened cream cheese until smooth. Then add the melted white chocolate, powdered sugar, and vanilla extract.
- Whip the Cream: In a separate bowl, whip the heavy cream until stiff peaks form.
- Combine the Mixtures: Gently fold the whipped cream into the cream cheese mixture until no streaks remain.
- Assemble the Cheesecake: Pour the cheesecake filling over the prepared Oreo crust, spreading it evenly.
- Garnish and Chill: Top with crushed peppermint bark and refrigerate for at least 4 hours, or until set.
Notes
Make sure your cream cheese is at room temperature for smooth blending. Refrigerate for at least 4 hours to ensure the cheesecake sets properly.
Nutrition
- Serving Size: 1 slice
- Calories: 350
- Sugar: 15g
- Sodium: 150mg
- Fat: 25g
- Saturated Fat: 15g
- Unsaturated Fat: 0g
- Trans Fat: 0g
- Carbohydrates: 30g
- Fiber: 1g
- Protein: 4g
- Cholesterol: 70mg