
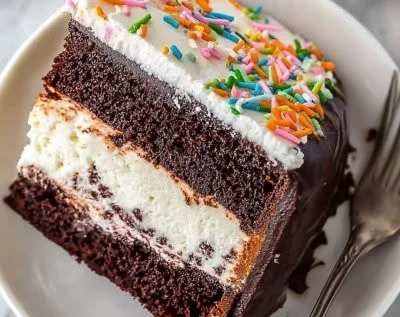
There’s something truly magical about a homemade ice cream cake, don’t you think? A towering delight that combines your favorite flavors of chocolate and vanilla, layered over a crunchy crust made from cookies that could take your breath away. This dessert takes me back to my childhood summers, where every birthday and family gathering meant one thing: cake! I remember the joy of watching my mom deftly piece together layers of ice cream, as the sweet scent of chocolate wafted through the kitchen. What’s more? This cake is incredibly simple to make, yet delivers a prestigious wow-factor. So let’s get started on crafting our own ice cream cake masterpiece!
Recipe Timing
- Prep Duration: 15 minutes
- Active Cooking: 10 minutes
- Total Duration: 1 hour (including freezing time)
- Portion Size: Serves 8
- Complexity: Simple
Nutritional Recipe
- Calories per portion: Approximately 350
- Protein: 5g
- Carbs: 42g
- Fats: 18g
- Fiber: 1g
- Sugars: 25g
- Sodium: 170mg
Why You’ll Love This Homemade Ice Cream Cake
This cake is not just a feast for the eyes; it’s a treat that tantalizes your taste buds. The combination of rich chocolate ice cream and creamy vanilla, layered on a buttery cookie crust, creates an indulgence that’s perfect for any celebration or simple family dinner. But what truly makes this dessert shine is its versatility. You can customize it with your favorite flavors and toppings to suit any palate. Plus, it’s a fantastic way to beat the heat on a hot summer day!
The Complete Cooking Journey
Building a homemade ice cream cake is a delightful journey. From crushing the cookies to assembling the layers, every step envelops you in the sweet excitement of anticipating the first bite. The satisfaction of creating something so decadent from scratch is an experience worth sharing with your loved ones. Let’s get your ice cream cake journey started!
Ingredients:
- Chocolate ice cream
- Vanilla ice cream
- Chocolate wafer cookies or Oreo cookies
- Butter (for crust)
- Whipped cream (for topping)
- Chocolate shavings (for garnish)
Method:
Step 1: Create the Cookie Crust
Start by crushing the chocolate wafer cookies or Oreo cookies in a bowl. Mix the crushed cookies with melted butter until well combined. Then, press this mixture into the bottom of a cake pan, forming a solid crust.
Step 2: Spread the Chocolate Ice Cream
Take the slightly softened chocolate ice cream and spread it evenly over your cookie crust. Use a spatula to smooth it out, making sure every bit of the crust is covered with this luscious chocolate layer.
Step 3: Freeze the First Layer
Place the cake pan in your freezer for about 10 minutes. This will give the chocolate layer a chance to firm up a bit before we add the next layer.
Step 4: Layer on the Vanilla Ice Cream
Next, soften the vanilla ice cream slightly, and spread it carefully on top of the set chocolate ice cream. Use gentle motions to ensure that you don’t disturb the layer beneath.
Step 5: Final Freeze
Pop the cake back into the freezer, letting it sit until fully set – this usually takes around 2 hours or until it’s firm enough to slice.
Step 6: Finish with Whipped Cream and Shavings
Before serving, generously top the cake with whipped cream and sprinkle chocolate shavings on top for that extra touch of glamour!
Serving Suggestions & Pairings
This homemade ice cream cake pairs beautifully with fresh berries or a warm fudge sauce drizzled over the top. Serve it along with a scoop of additional chocolate or vanilla ice cream for the ultimate ice cream experience. It also makes a fantastic treat alongside a hot cup of coffee or tea.
Storage & Leftovers Guide
You can store leftovers in the freezer, tightly covered with plastic wrap or aluminum foil, for up to 1 week. This cake holds up wonderfully for a few days, though I doubt it will last that long once you share it with your family and friends!
Kitchen Wisdom & Success Tips
- Soften ice cream just enough: Make sure the ice cream is softened but not melted for easy spreading.
- Use a springform pan: If you have one, a springform pan makes removing the cake much easier!
- Garnish just before serving: To keep the whipped cream fresh, wait until you’re ready to serve before adding your topping.
Flavor Variations & Adaptations
Feeling adventurous? Try swapping in different flavored ice creams like strawberry or coffee for a unique twist. You might also play with different types of cookies for the crust—have you thought about using graham crackers or even chocolate chip cookies?
Reader Questions & Solutions
- How can I tell if my ice cream is softened enough?: It should be soft enough to spread easily, but still hold its shape.
- Can I use non-dairy ice cream?: Absolutely! Non-dairy options work well and taste fantastic for a vegan version.
- What if I don’t have chocolate wafer cookies?: No problem! You can use any kind of cookie that you enjoy.
- How do I easily slice the frozen cake?: Dip a sharp knife in warm water and wipe it dry before slicing for clean cuts.
- Can I freeze it for longer than a week?: While it’s best enjoyed fresh, it can be frozen for a longer duration, though texture might change slightly.
Wrapping Up
This homemade ice cream cake is not just a dessert; it’s an occasion, a reason to celebrate the simple joys of life with those you love. The rich, creamy layers dance together harmoniously, creating delight in every bite. It’s easy, it’s customizable, and most importantly, it brings smiles to faces. So grab your favorite ice cream, some cookies, and join me in making this spectacular treat that will surely be a hit at your next gathering!
PrintHomemade Ice Cream Cake
A delicious homemade ice cream cake featuring rich chocolate and creamy vanilla ice cream layered over a crunchy cookie crust.
- Prep Time: 15 minutes
- Cook Time: 10 minutes
- Total Time: 60 minutes
- Yield: 8 servings 1x
- Category: Dessert
- Method: No-Bake
- Cuisine: American
- Diet: Vegetarian
Ingredients
- 2 cups Chocolate ice cream
- 2 cups Vanilla ice cream
- 1 ½ cups Chocolate wafer cookies or Oreo cookies
- ½ cup Butter (melted, for crust)
- 1 cup Whipped cream (for topping)
- Chocolate shavings (for garnish)
Instructions
- Crush the chocolate wafer cookies or Oreo cookies in a bowl.
- Mix the crushed cookies with melted butter until well combined.
- Press this mixture into the bottom of a cake pan, forming a solid crust.
- Take the slightly softened chocolate ice cream and spread it evenly over your cookie crust.
- Place the cake pan in your freezer for about 10 minutes.
- Soften the vanilla ice cream slightly, and spread it carefully on top of the set chocolate ice cream.
- Pop the cake back into the freezer for about 2 hours or until firm.
- Top the cake with whipped cream and sprinkle chocolate shavings before serving.
Notes
Use a springform pan for easy removal. Garnish just before serving to keep whipped cream fresh.
Nutrition
- Serving Size: 1 slice
- Calories: 350
- Sugar: 25g
- Sodium: 170mg
- Fat: 18g
- Saturated Fat: 10g
- Unsaturated Fat: 6g
- Trans Fat: 0g
- Carbohydrates: 42g
- Fiber: 1g
- Protein: 5g
- Cholesterol: 30mg


