
There’s something deeply comforting about the aroma of baked apples wafting through the house, a sweet scent that wraps you like a warm hug. Growing up in Chicago, I often found myself at family gatherings where my aunts competed to bring the best dessert. But my absolute favorite was always the Chicago-style Apple Slices. As a kid, I watched in awe as my mother expertly prepared these slices, transforming simple apples into mouthwatering treats that were the perfect combination of sweet and spiced. Nowadays, I find joy in recreating that very same magic during autumn, when apples are at their peak. It’s a nostalgic journey, and I can’t wait for you to share in this delicious experience with me.
Recipe Timing
- Prep Duration: 15 minutes
- Active Cooking: 45 minutes
- Total Duration: 1 hour
- Portion Size: Serves 6-8
- Complexity: Simple
Nutritional Recipe
- Calories per portion: Approximately 230
- Protein: 1 g per serving
- Carbs: 39 g per serving
- Fats: 9 g per serving
- Fiber: 2 g per serving
- Sugars: 16 g per serving
- Sodium: 40 mg per serving
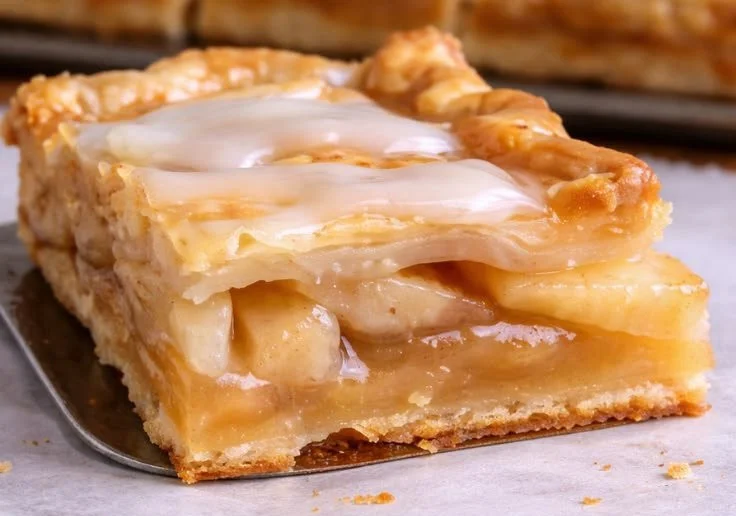
Why You’ll Love This Chicago-style Apple Slices
These Chicago-style Apple Slices are not just a dessert; they are a celebration of flavors—tartness from crispy apples, warmth from cinnamon, and a touch of sweetness that makes every bite comforting. Whether you’re enjoying them fresh out of the oven with a scoop of vanilla ice cream or served at room temperature paired with a cup of coffee, they evoke memories of family gatherings, laughter, and warmth. Plus, they’re incredibly easy to make, so you can whip them up any day you crave a slice of nostalgia.
The Complete Cooking Journey
Let me guide you through the delightful process of preparing these Chicago-style Apple Slices. You’ll see just how simple it is to transform a handful of fresh apples into an irresistible treat that fills your kitchen with warmth and joy.
Ingredients:
- 4 large apples, sliced (Use firm apples like Granny Smith, Honeycrisp, or Fuji.)
- 1 cup granulated sugar
- 2 teaspoons ground cinnamon (For extra flavor, consider adding a pinch of nutmeg or ginger.)
- 2 tablespoons melted butter
- 1 tablespoon lemon juice
- 1/2 cup all-purpose flour
- 1/4 teaspoon salt
Method:
Step 1: Prepare Your Apples
Start by preheating your oven to 350°F (175°C). Wash and slice your four large apples. Choose firm varieties like Granny Smith for a delightful tartness or Honeycrisp for a subtly sweet crunch. As you slice, keep an eye out for any bruised areas and remove those—no one wants that in their dessert!
Step 2: Mix the Sweetness
In a large mixing bowl, combine the sliced apples with 1 cup of granulated sugar and 2 teaspoons of ground cinnamon. Feel free to add that pinch of nutmeg or ginger for an extra burst of warmth. Toss the mixture until the apples are evenly coated with sugar and spice. The colorful slices should shimmer like jewels by the time you’re done!
Step 3: Add Flavor Enhancements
Drizzle in 2 tablespoons of melted butter and 1 tablespoon of lemon juice over the apple mixture. The butter lends a rich flavor while the lemon juice brightens it all up, balancing the sweetness. Give everything a good stir to ensure each apple slice is beautifully coated.
Step 4: Create the Crust Mix
In another bowl, whisk together 1/2 cup of all-purpose flour and a pinch of 1/4 teaspoon of salt. This simple mixture will form the base for your apple slices, ensuring they don’t stick and that your dessert has a lovely, light texture.
Step 5: Combine and Layer
Now it’s time to layer! In a buttered baking dish, pour the apple mixture first, ensuring it spreads evenly. Next, sprinkle the flour mixture over the apples, ensuring an even covering for that perfect topping.
Step 6: Bake to Perfection
Pop your baking dish into the preheated oven and let it bake for 30-35 minutes, until the apples are tender and the top is a golden brown. Your kitchen should start smelling divine—an aroma that hints at the deliciousness in store.
Step 7: Cool and Serve
Once baked, allow the apple slices to cool for a few minutes before serving. This helps the flavors meld together beautifully. Serve warm or at room temperature for a comforting treat.
Serving Suggestions & Pairings
These Chicago-style Apple Slices are delightful on their own, but try pairing them with a scoop of creamy vanilla ice cream or a dollop of whipped cream. For coffee lovers, a hot cup of java pairs perfectly with this dish, allowing you to savor each bite. You could even use them as a filling in crepes or enjoy them alongside pancakes for a brunch treat!
Storage & Leftovers Guide
If you find that you have leftovers (which is rare, but it happens!), store them in an airtight container in the refrigerator. They will stay fresh for up to 3 days. To reheat, simply pop them in the microwave for about 20 seconds or warm them in the oven at 350°F (175°C) until heated through.
Kitchen Wisdom & Success Tips
- For the best flavor, let your apple mixture sit for about 10 minutes before baking; it allows the sugar to draw out juices, enhancing the taste.
- Using a combination of sweet and tart apples can create a complex flavor profile.
- Don’t skip the lemon juice! It not only enhances the flavor but prevents the apples from browning too quickly.
Flavor Variations & Adaptations
Feel free to get creative! Consider adding raisins or cranberries for a chewy texture, or sprinkle chopped nuts on top for a crunchy contrast. You can also swap out the flour for almond or oat flour for a gluten-free version.
Reader Questions & Solutions
-
Can I use frozen apples for this recipe?
Yes, but thaw and drain them first to avoid a watery mixture. -
What if I don’t have sugar?
Brown sugar or honey can be used instead, keeping in mind that honey will add a different flavor. -
Can I make this vegan?
Absolutely! Substitute butter with coconut oil or vegan butter and omit the butter in the topping. -
How do I prevent the apples from getting too mushy?
Choosing firmer apple varieties like Fuji or Honeycrisp ensures a better texture, and don’t overbake them! -
What’s the best way to slice the apples?
Thin slices (about 1/4 inch thick) work best for even baking. A mandoline slicer can make this process easier!
Wrapping Up
As you embark on your cooking journey with these Chicago-style Apple Slices, may each step remind you of the love and warmth shared during family gatherings. It’s not just about baking; it’s about creating memories that last longer than the dessert itself. So, roll up your sleeves, grab those apples, and let’s make some magic in the kitchen together! Enjoy every delicious bite, and don’t forget to share your creations with those you love. Happy baking!
PrintChicago-style Apple Slices
A nostalgic dessert featuring tart apples baked with cinnamon and sugar, perfect for autumn gatherings.
- Prep Time: 15 minutes
- Cook Time: 30 minutes
- Total Time: 45 minutes
- Yield: 6-8 servings 1x
- Category: Dessert
- Method: Baking
- Cuisine: American
- Diet: Vegetarian
Ingredients
- 4 large apples, sliced
- 1 cup granulated sugar
- 2 teaspoons ground cinnamon
- 2 tablespoons melted butter
- 1 tablespoon lemon juice
- 1/2 cup all-purpose flour
- 1/4 teaspoon salt
Instructions
- Prepare your apples by preheating the oven to 350°F (175°C). Wash and slice apples, removing any bruised areas.
- Mix the sliced apples with sugar and cinnamon in a large bowl. Toss until evenly coated.
- Add melted butter and lemon juice to the apple mixture and stir to coat.
- Create a flour mixture by whisking flour and salt in a separate bowl.
- Combine by pouring the apple mixture into a buttered baking dish and sprinkling the flour mixture on top.
- Bake for 30-35 minutes until the apples are tender and the top is golden brown.
- Cool for a few minutes before serving warm or at room temperature.
Notes
Serve with vanilla ice cream or whipped cream for a delightful treat. Store leftovers in an airtight container in the fridge for up to 3 days.
Nutrition
- Serving Size: 1 serving
- Calories: 230
- Sugar: 16g
- Sodium: 40mg
- Fat: 9g
- Saturated Fat: 4g
- Unsaturated Fat: 5g
- Trans Fat: 0g
- Carbohydrates: 39g
- Fiber: 2g
- Protein: 1g
- Cholesterol: 20mg


