
There’s something so magical about a cake that captures the essence of a snowy winter day — fluffy, sweet, and a little whimsical. I first discovered the delightful Snowball Cake at a community potluck, where it stole the show with its snowy white appearance and creamy texture. My love for this cake grew as I watched my friends dive into it, delighted by its sweetness and the beautiful way it brought us together around the table. It’s a dessert that not only satisfies a sweet tooth but also sparks joyous memories and warm conversations. On days when life feels hectic, this Snowball Cake becomes my go-to recipe, infusing a splash of joy and nostalgia into every bite.
## Recipe Timing
- Prep Duration: 15 minutes
- Active Cooking: 30 minutes
- Total Duration: 2 hours 45 minutes (includes chilling time)
- Portion Size: Serves 12-15
- Complexity: Simple
## Nutritional Recipe
- Calories per portion: Approximately 250 calories
- Protein: 3 grams
- Carbs: 38 grams
- Fats: 10 grams
- Fiber: 1 gram
- Sugars: 23 grams
- Sodium: 220 mg
## Why You’ll Love This Snowball Cake Recipe
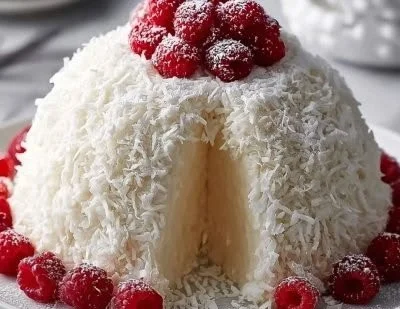
Snowball Cake isn’t just another cake; it’s a celebration of sweetness! It offers a luscious combination of flavors and textures, featuring a moist white cake soaked in sweetened condensed milk with a creamy marshmallow topping and a sprinkle of coconut that brings to mind the softness of snow. This dessert is perfect for gatherings, holidays, or simply as a treat during a long week. It’s a recipe that invites simplicity and happiness back into our busy lives.
## The Complete Cooking Journey
Let’s embark on this delightful baking adventure together! Making Snowball Cake is an experience filled with simple steps that anyone can master, whether you’re a novice in the kitchen or a seasoned baker. The ingredients come together quickly, and before you know it, you’ll be basking in the glow of a beautifully frosted cake, ready to share with friends and family.
## Ingredients:
- 1 box white cake mix, prepared according to package directions
- 1 can sweetened condensed milk
- 1 jar marshmallow creme
- 1 cup whipped topping
- 1/2 cup powdered sugar
- 1 teaspoon vanilla extract
- 1 cup shredded sweetened coconut
## Method:
### Step 1: Preheat the Oven
Preheat your oven as directed on the cake mix box. This is essential for ensuring that your cake rises perfectly with the right texture.
### Step 2: Prepare the Cake Batter
Prepare the white cake mix according to the package instructions and pour it into a greased 9×13-inch baking pan.
### Step 3: Bake to Perfection
Bake as directed, usually around 30 minutes, until a toothpick inserted comes out clean. The aroma of the baking cake will fill your kitchen and set a lovely mood!
### Step 4: Poke Holes
When the cake is still warm, use the handle of a wooden spoon to poke holes all over the surface of the cake. This will allow the sweetened condensed milk to soak deeply, keeping the cake moist and flavorful.
### Step 5: Soak with Sweetness
Evenly pour the entire can of sweetened condensed milk over the cake, making sure it seeps into all the holes you’ve created. Allow it to absorb fully for a few minutes — patience here is key!
### Step 6: Make the Creamy Topping
In a medium mixing bowl, combine the marshmallow creme, whipped topping, powdered sugar, and vanilla extract. Stir gently until the mixture is smooth and creamy.
### Step 7: Spread the Cream
Once the cake has cooled completely, evenly spread the marshmallow and whipped topping mixture over the cake’s surface. This creamy layer adds a beautiful sweetness and a light texture contrast.
### Step 8: Garnish with Coconut
Generously sprinkle the shredded sweetened coconut over the top of the cake. The coconut mimics the look of fresh snowballs, adding both texture and flavor.
### Step 9: Chill Before Serving
Refrigerate the cake for at least 2 hours before serving. This chilling time allows the flavors to meld and the cake to set properly for clean slices.
## Serving Suggestions & Pairings
Serve your Snowball Cake with fresh berries, a drizzle of chocolate sauce, or a scoop of vanilla ice cream. A cup of warm coffee or a chilled glass of milk pairs perfectly with this sweet treat.
## Storage & Leftovers Guide
Snowball Cake keeps beautifully in the refrigerator for 3-4 days. To store, cover it tightly with plastic wrap or aluminum foil to maintain its moisture and freshness.
## Kitchen Wisdom & Success Tips
- For added flavor, consider using coconut-flavored whipped topping.
- Ensure the cake completely cools before adding the topping to prevent it from melting.
- You can generously decorate with more coconut or even chocolate shavings for an extra touch!
## Flavor Variations & Adaptations
Try swapping the white cake mix for a chocolate or lemon-flavored mix to give a new twist to this classic dessert. You can also use unsweetened coconut for a less sugary flavor, or add citrus zest into the topping for a bit of zing.
## Reader Questions & Solutions
-
How do I store leftover cake?
Keep the cake in the refrigerator for up to 4 days in an airtight container. -
Can I make this cake ahead of time?
Absolutely! This cake can be made up to a day in advance; just chill it in the fridge. -
Can I freeze Snowball Cake?
While the cake can be frozen, the topping may alter in texture. It’s best enjoyed fresh! -
What if I don’t have marshmallow creme?
You can substitute with a mix of cream cheese and powdered sugar for a different but delicious flavor. -
Is there a non-dairy version?
Yes! Use a vegan cake mix, coconut cream, and non-dairy whipped topping to make a dairy-free version.
## Wrapping Up
The Snowball Cake is not just a sweet treat; it’s a delightful experience that gathers friends and family together, just like the memories associated with every slice. I encourage you to try this recipe and share your own stories around the table. The joy of baking is not just in the ingredients but in the love and laughter it brings to our lives. Enjoy every bite of your Snowball Cake — it’s bound to bring smiles all around! Happy baking!
PrintSnowball Cake

A delightful and fluffy cake that captures the essence of a snowy winter day with its creamy texture and sweet flavors.
- Prep Time: 15 minutes
- Cook Time: 30 minutes
- Total Time: 165 minutes
- Yield: 12-15 servings 1x
- Category: Dessert
- Method: Baking
- Cuisine: American
- Diet: Vegetarian
Ingredients
- 1 box white cake mix, prepared according to package directions
- 1 can sweetened condensed milk
- 1 jar marshmallow creme
- 1 cup whipped topping
- 1/2 cup powdered sugar
- 1 teaspoon vanilla extract
- 1 cup shredded sweetened coconut
Instructions
- Preheat your oven as directed on the cake mix box.
- Prepare the white cake mix according to the package instructions and pour it into a greased 9×13-inch baking pan.
- Bake as directed, usually around 30 minutes, until a toothpick inserted comes out clean.
- Poke holes all over the surface of the warm cake using the handle of a wooden spoon.
- Pour the entire can of sweetened condensed milk over the cake.
- Allow it to absorb for a few minutes.
- Combine marshmallow creme, whipped topping, powdered sugar, and vanilla extract in a bowl and stir until smooth.
- Spread the creamy topping mixture evenly over the cooled cake.
- Sprinkle shredded sweetened coconut on top.
- Refrigerate the cake for at least 2 hours before serving.
Notes
For added flavor, consider using coconut-flavored whipped topping. Ensure the cake cools completely before adding the topping.
Nutrition
- Serving Size: 1 serving
- Calories: 250
- Sugar: 23g
- Sodium: 220mg
- Fat: 10g
- Saturated Fat: 8g
- Unsaturated Fat: 2g
- Trans Fat: 0g
- Carbohydrates: 38g
- Fiber: 1g
- Protein: 3g
- Cholesterol: 0mg


