
There’s something undeniably captivating about the vibrant hue of red velvet brownies, like a delightful burst of color amidst a sea of traditional chocolate desserts. The first time I tried red velvet brownies, I was enchanted. It was a sunny afternoon, and the aroma of freshly baked goods wafted through the kitchen, tempting everyone in the house. The moment I sank my teeth into one of those chewy, velvety squares, I was transported back to my childhood—a time when a simple brownie could make everything feel right in the world.
Now, these aren’t your ordinary brownies; they have the essence of red velvet, with that faint tang from the vinegar, balanced perfectly by sweet chocolate and creamy white chocolate chips. Whether you’re celebrating a special occasion or simply yearning to indulge in a little something sweet, these brownies are your ticket to happiness.
## Recipe Timing
- Prep Duration: 15 minutes
- Active Cooking: 35 minutes
- Total Duration: 50 minutes
- Portion Size: 16 brownies
- Complexity: Simple
## Nutritional Recipe
- Calories per portion: Approx. 200
- Protein: 2g per serving
- Carbs: 25g per serving
- Fats: 10g per serving
- Fiber: 0g per serving
- Sugars: 14g per serving
- Sodium: 120mg per serving
## Why You’ll Love This Red Velvet Brownies
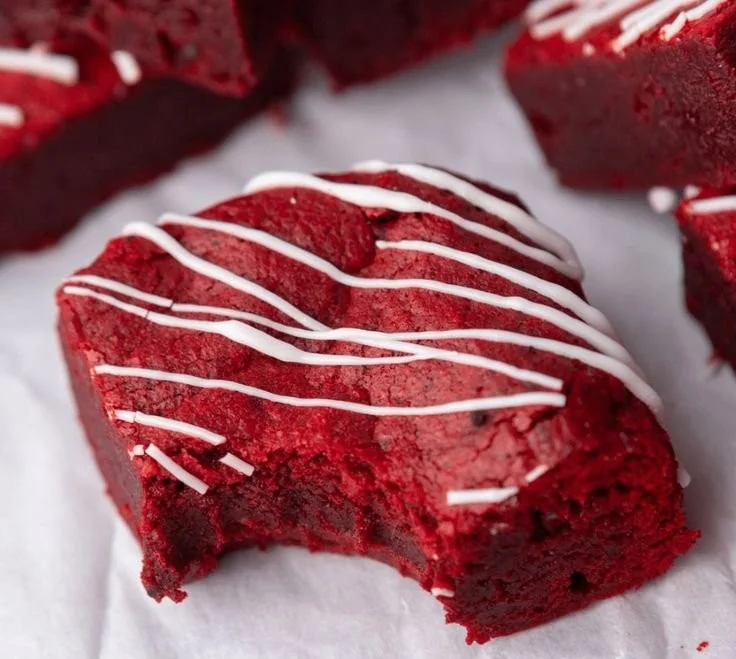
These red velvet brownies strike the perfect balance between rich chocolate flavor and that unique red velvet flair. They’re soft and moist, with a slightly chewy texture that will make you crave just one more square. The optional white chocolate chips add a creamy touch, enhancing the overall experience while giving you little bursts of sweetness. Plus, the striking red hue makes these brownies not just a treat for the taste buds but a feast for the eyes!
## The Complete Cooking Journey
### Step 1: Preheat Your Kitchen
Start by preheating your oven to 350°F (175°C). This ensures that you achieve that perfect bake from the moment your brownies hit the heat. While you’re at it, line an 8×8 inch baking pan with parchment paper for easy removal later on.
### Step 2: Melt Chocolate and Butter
In a large microwave-safe bowl, combine the melted butter and chopped semi-sweet chocolate. Microwave in 30-second increments, stirring after each increment until everything is smooth and combined. Take a moment to inhale the chocolatey aroma—it’s heavenly!
### Step 3: Mix in Sugar and Eggs
Add the granulated sugar to the melted chocolate mixture and stir until well combined. Next, add the eggs one at a time, mixing thoroughly after each addition. This helps create that luscious texture in your brownies.
### Step 4: Flavor Infusions
Stir in the vanilla extract, white vinegar, and the enchanting red gel food coloring. The coloring not only gives the brownies that signature red hue but also plays a role in balancing flavors with the vinegar.
### Step 5: Prepare Your Dry Ingredients
In a separate bowl, sift together the cocoa powder, all-purpose flour, and salt. This step prevents lumps and ensures a smooth batter.
### Step 6: Combine Wet and Dry Ingredients
Slowly add the dry ingredients to the wet mixture, stirring gently until just combined. Be careful not to overmix; we want a tender brownie, not a tough one!
### Step 7: Fold in White Chocolate Chips
If you’re using white chocolate chips, gently fold them into the brownie batter. This adds delightful pockets of creaminess in every bite.
### Step 8: Bake to Perfection
Pour the brownie batter into your prepared pan, spreading it evenly. Bake in the preheated oven for approximately 30-35 minutes. Keep an eye on them; they’re done when a toothpick inserted into the center comes out with a few moist crumbs.
### Step 9: Cool and Cut
Once you’ve taken them out, allow the brownies to cool completely in the pan before cutting them into squares. The waiting is tough, but trust me, it’s worth it!
### Step 10: Optional Garnishing
For an extra touch, melt some white chocolate chips and drizzle them over the cooled brownies. This doesn’t just enhance the visual appeal; it elevates the taste.
## Serving Suggestions & Pairings
These decadent red velvet brownies shine on their own, but if you want to take it up a notch, they’re perfect served warm with a scoop of vanilla ice cream or a dollop of whipped cream. For an extra indulgent experience, pair them with a frothy coffee or a tall glass of cold milk.
## Storage & Leftovers Guide
Store your red velvet brownies in an airtight container at room temperature for up to 3 days. If you want them to last longer, refrigerate them for up to a week. Just make sure to keep them sealed to maintain freshness.
## Kitchen Wisdom & Success Tips
- Don’t Overmix: Mixing too long can lead to dense brownies. Stir until ingredients are just combined.
- Test for Doneness: The toothpick test is your friend; look for moist crumbs, not wet batter.
- Parchment Paper: Always use parchment paper for easy brownie removal, especially since these are rich and gooey!
## Flavor Variations & Adaptations
Feel free to switch things up! Try using dark chocolate instead of semi-sweet for a more intense cocoa flavor, or add crushed nuts for an extra crunch. If you love a bit of tang, experiment by adding a splash of buttermilk instead of vinegar.
## Reader Questions & Solutions
-
Can I substitute the butter with oil?
Yes, you can use vegetable or coconut oil in the same quantity, but it might change the texture slightly. -
What can I use if I don’t have red food coloring?
You could use beetroot powder for a natural alternative, but it may change the overall flavor a bit. -
How do I know when the brownies are baked?
Insert a toothpick into the center; if it comes out with a few moist crumbs, they are ready! -
Can I freeze these brownies?
Absolutely! Wrap them well in plastic wrap and foil, and they’ll stay fresh for up to 2 months. -
What if I don’t have white chocolate chips?
You can skip them or use any other chips you have on hand, like milk chocolate or butterscotch.
## Wrapping Up
Making red velvet brownies is not just about the end product; it’s about the joy of baking and the memories created along the way. Whether you’re sharing them with loved ones, savoring them solo, or gifting them to a friend, each bite is a celebration. So, put on your apron and let’s get baking! The lusciousness awaits; I guarantee you won’t be disappointed. Happy baking!
PrintRed Velvet Brownies
Delightful red velvet brownies with a soft, chewy texture and bursts of creamy white chocolate.
- Prep Time: 15 minutes
- Cook Time: 35 minutes
- Total Time: 50 minutes
- Yield: 16 brownies 1x
- Category: Dessert
- Method: Baking
- Cuisine: American
- Diet: Vegetarian
Ingredients
- 1 cup (226g) unsalted butter, melted
- 8 oz (227g) semi-sweet chocolate, chopped
- 1 1/2 cups (300g) granulated sugar
- 4 large eggs
- 1 tsp vanilla extract
- 1 tsp white vinegar
- 1 tbsp red gel food coloring
- 1/2 cup (50g) cocoa powder
- 1 cup (125g) all-purpose flour
- 1/2 tsp salt
- 1 cup (170g) white chocolate chips (optional)
Instructions
- Preheat the oven to 350°F (175°C) and line an 8×8 inch baking pan with parchment paper.
- Combine the melted butter and chopped semi-sweet chocolate in a large microwave-safe bowl and microwave until smooth.
- Add the granulated sugar to the chocolate mixture and mix well. Then, add the eggs one at a time, mixing thoroughly after each egg.
- Stir in the vanilla extract, white vinegar, and red gel food coloring until combined.
- Sift together the cocoa powder, all-purpose flour, and salt in a separate bowl.
- Gradually add the dry ingredients to the wet mixture, stirring gently until just combined.
- Fold in the white chocolate chips if using.
- Pour the brownie batter into the prepared pan and spread evenly.
- Bake in the oven for 30-35 minutes or until a toothpick inserted comes out with a few moist crumbs.
- Cool in the pan before cutting into squares and optionally drizzle melted white chocolate on top.
Notes
Store brownies in an airtight container for up to 3 days at room temperature or refrigerate for up to a week.
Nutrition
- Serving Size: 1 brownie
- Calories: 200
- Sugar: 14g
- Sodium: 120mg
- Fat: 10g
- Saturated Fat: 6g
- Unsaturated Fat: 4g
- Trans Fat: 0g
- Carbohydrates: 25g
- Fiber: 0g
- Protein: 2g
- Cholesterol: 50mg


