

There’s something undeniably enchanting about a celebration cake, especially one that plays the role of a sparkle in the midst of life’s joyous moments. As I stood in my kitchen with a bottle of luscious pink champagne, a spark of inspiration flickered—why not transform this elegant drink into a delightful cake? Thus began my quest to create the perfect Pink Champagne Cake, a sweet treat that embodies joy and is fit for any celebration. The sweet aroma of baking wafted through the air, mingling with the bubbly essence of champagne, creating an atmosphere of festivity even before the first slice was cut.
Recipe Timing
- Prep Duration: 40 minutes
- Active Cooking: 30 minutes
- Total Duration: 1 hour 10 minutes
- Portion Size: Serves 12
- Complexity: Moderate
Nutritional Recipe
- Calories per portion: Approximately 460
- Protein: 3g per serving
- Carbs: 62g per serving
- Fats: 20g per serving
- Fiber: 1g per serving
- Sugars: 43g per serving
- Sodium: 220mg per serving
Why You’ll Love This Pink Champagne Cake
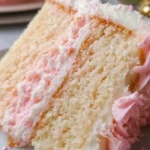
This Pink Champagne Cake is not just a dessert; it’s a celebration on a plate. The moist cake is infused with the luxurious flavor of pink champagne, epitomizing decadence while remaining light and airy. Each bite melts in your mouth, bringing together a delightful sweetness from the sugar and a hint of tang from the buttermilk and champagne. Topped with a rich and creamy pink champagne frosting, this cake is perfect for birthdays, anniversaries, or simply because you deserve to treat yourself!
The Complete Cooking Journey
Creating the Pink Champagne Cake is like crafting a beautiful symphony, with each step harmonizing to produce a delicious finale. The process begins with the gentle warming of whisked egg whites and culminates in a frosting swirl that looks almost too pretty to eat!
Ingredients:
- 6 Tablespoons (85 g) unsalted butter, softened to room temperature
- 2 cups (400 g) granulated sugar
- ⅔ cup (160 ml) neutral cooking oil (canola, vegetable, or avocado)
- ¾ teaspoon vanilla extract
- 2 ¾ cups (345 g) all-purpose flour
- 1 Tablespoon baking powder
- 1 teaspoon table salt
- ½ cup (118 ml) buttermilk
- ½ cup (118 ml) pink champagne
- 6 large egg whites, room temperature preferred
- Pink food coloring (optional)
For the pink champagne frosting:
- 2 ¼ cups (532 ml) pink champagne
- 1 ½ cups (339 g) salted butter, softened
- ¼ teaspoon vanilla extract
- 6 cups (750 g) powdered sugar
Method:
Step 1: Prepare the Oven and Pans
Preheat your oven to 350°F (175°C) and lightly grease and flour 3 8-inch round cake pans, lining the bottoms with parchment paper.
Step 2: Creaming Butter and Sugar
In a large bowl, beat the softened butter until creamy and dreamy, then add the granulated sugar, neutral oil, and vanilla extract. Mix until everything is well combined, creating a sweet, golden mixture.
Step 3: Whisking the Dry Ingredients
In a separate bowl, whisk together the flour, baking powder, and salt. This will ensure the dry ingredients are evenly distributed so your cake rises beautifully.
Step 4: Alternating Ingredients
Using a spatula, alternate in adding the flour mixture and buttermilk to the butter mixture, stirring gently until just combined.
Step 5: Mixing in the Champagne
Repeat the process by alternating in the flour and pink champagne until the batter is smooth and well-combined. If you’re feeling adventurous, add a few drops of pink food coloring for that extra pop of color!
Step 6: Folding in Egg Whites
In a clean bowl, whip the egg whites until stiff peaks form. Gently fold the whipped egg whites into the cake batter, being careful not to deflate the bubbles you just created.
Step 7: Dividing the Batter
Divide the velvety batter evenly among the prepared pans, smoothing the tops with the back of your spatula.
Step 8: Baking the Cakes
Bake in the preheated oven for 25-28 minutes, or until a toothpick inserted into the center comes out clean. The sweet smell of cake will fill your kitchen, making your heart sing!
Step 9: Cooling the Cakes
Let the cakes cool in the pans for about 10-15 minutes, then transfer them to a cooling rack to cool completely.
Step 10: Crafting the Pink Champagne Reduction
While the cakes are cooling, heat pink champagne in a skillet over medium heat until it reduces down to about 6 tablespoons. Set aside to cool.
Step 11: Preparing the Frosting
In a mixing bowl, beat the softened salted butter until creamy, then gradually add in the powdered sugar, mixing well until light and fluffy.
Step 12: Adding Champagne to the Frosting
Stir in the vanilla extract and the cooled champagne reduction until smooth and rich, perfect for frosting your cake.
Step 13: Assembling the Cake
Once completely cool, level the tops of your cakes if necessary. Frost between layers and around the entire cake, adding decorative swirls and sprinkles if desired.
Serving Suggestions & Pairings
This Pink Champagne Cake sings beautifully alongside a glass of chilled champagne or a light sparkling rosé. For a balanced meal, serve it after a festive dinner filled with love and laughter. Fresh berries can add a nice tartness, pairing perfectly with the sweet cake.
Storage & Leftovers Guide
This cake is best enjoyed fresh but can be stored in an airtight container at room temperature for up to 2 days. If you need to keep it longer, refrigerate it for up to a week, ensuring it stays moist and delicious.
Kitchen Wisdom & Success Tips
- Room Temperature Ingredients: Make sure your eggs and butter are at room temperature for the best incorporation.
- Don’t Overmix: Gently folding the egg whites into the batter will keep the cake light and airy—overmixing can lead to dense results.
- Leveling Cakes: Use a serrated knife for leveling your cake tops to create a perfectly stacked finish.
Flavor Variations & Adaptations
Feel free to experiment with different sparkling wines like prosecco or even fruit-flavored sparkling beverages! You can also swap out the pink coloring for pastel shades or leave it natural.
Reader Questions & Solutions
-
Q: Can I use regular milk instead of buttermilk?
A: Yes! For buttermilk, substitute with regular milk mixed with a teaspoon of vinegar or lemon juice to mimic the acidity. -
Q: What if I don’t have pink champagne?
A: Any sparkling wine will do! Prosecco or even a fruity soda can work in place of champagne for a non-alcoholic version. -
Q: How do I know when my cakes are done baking?
A: Insert a toothpick into the center. If it comes out clean or with just a few crumbs, you’re good to go! -
Q: Can I make this cake ahead of time?
A: Absolutely! You can bake the layers a day in advance and keep them wrapped tightly in foil until you’re ready to frost. -
Q: How can I fix a sunken cake?
A: Sunken cakes often come from underbaking or too much leavening. Ensure your oven is preheated correctly and avoid opening the door frequently!
Wrapping Up
As you slice into this luscious Pink Champagne Cake, each layer reveals a story of joy and celebration. Your efforts in the kitchen turn into not just a dessert, but a centerpiece that brings friends and family together for unforgettable moments. So don your favorite apron, and let this cake inspire you to celebrate the sweet decorations in life—after all, every day is worth a little sparkle! Happy baking!
PrintPink Champagne Cake
A delightful Pink Champagne Cake embodying joy and celebration, perfect for any festive occasion.
- Prep Time: 40
- Cook Time: 30
- Total Time: 70
- Yield: 12 servings 1x
- Category: Dessert
- Method: Baking
- Cuisine: American
- Diet: Vegetarian
Ingredients
- 6 Tablespoons (85 g) unsalted butter, softened
- 2 cups (400 g) granulated sugar
- ⅔ cup (160 ml) neutral cooking oil (canola, vegetable, or avocado)
- ¾ teaspoon vanilla extract
- 2 ¾ cups (345 g) all-purpose flour
- 1 Tablespoon baking powder
- 1 teaspoon table salt
- ½ cup (118 ml) buttermilk
- ½ cup (118 ml) pink champagne
- 6 large egg whites, room temperature preferred
- Pink food coloring (optional)
- 2 ¼ cups (532 ml) pink champagne for frosting
- 1 ½ cups (339 g) salted butter, softened
- ¼ teaspoon vanilla extract for frosting
- 6 cups (750 g) powdered sugar for frosting
Instructions
- Preheat your oven to 350°F (175°C) and lightly grease and flour 3 8-inch round cake pans, lining the bottoms with parchment paper.
- In a large bowl, beat the softened butter until creamy, then add the granulated sugar, neutral oil, and vanilla extract. Mix until well combined.
- In a separate bowl, whisk together the flour, baking powder, and salt.
- Alternate adding the flour mixture and buttermilk to the butter mixture until just combined.
- Repeat the process by alternating in the flour and pink champagne until smooth. Add food coloring if desired.
- Whip the egg whites until stiff peaks form. Gently fold into the batter.
- Divide the batter evenly among the prepared pans, smoothing the tops.
- Bake for 25-28 minutes or until a toothpick comes out clean.
- Let the cakes cool in the pans for 10-15 minutes, then transfer to a cooling rack.
- While the cakes cool, heat pink champagne in a skillet until it reduces to 6 tablespoons. Set aside to cool.
- In a mixing bowl, beat the salted butter until creamy, then gradually add powdered sugar until fluffy.
- Stir in vanilla extract and cooled champagne reduction.
- Once the cakes are completely cool, level the tops if necessary, then frost between layers and around the entire cake.
Notes
For best results, ensure all ingredients are at room temperature and avoid overmixing.
Nutrition
- Serving Size: 1 slice
- Calories: 460
- Sugar: 43g
- Sodium: 220mg
- Fat: 20g
- Saturated Fat: 8g
- Unsaturated Fat: 10g
- Trans Fat: 0g
- Carbohydrates: 62g
- Fiber: 1g
- Protein: 3g
- Cholesterol: 30mg


