
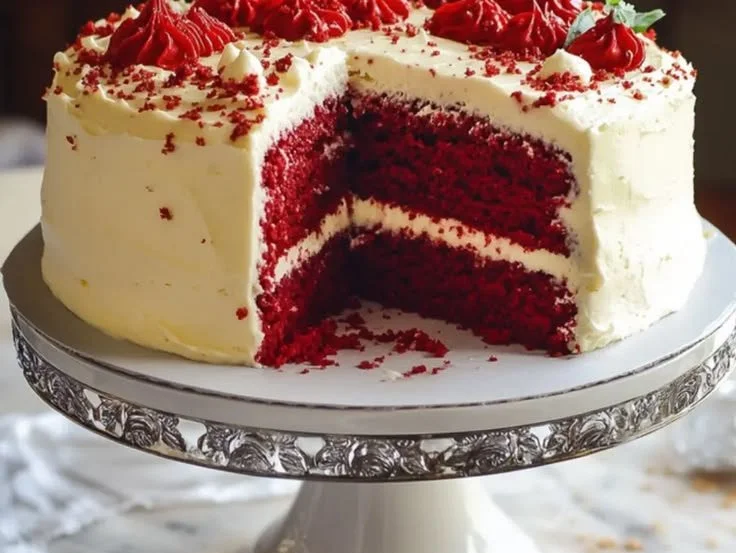
The aroma of freshly baked cake wafting through the kitchen can evoke memories of laughter and joy, often reminding us of special celebrations and cherished moments. When I think about the classic Old Fashioned Red Velvet Cake, I am transported back to my grandmother’s kitchen, where she would whip up this vibrant treat for family gatherings. The bright red color and creamy white frosting always added a sense of festivity, making every slice feel like a celebration.
This cake is not just about its looks; it’s the perfect blend of tenderness and flavor, with the cocoa adding an unexpected depth that balances the sweetness beautifully. Whether it’s a birthday, holiday, or just a bright Tuesday, this cake always manages to bring smiles to faces.
Recipe Timing
- Prep Duration: 20 minutes
- Active Cooking: 30 minutes
- Total Duration: 1 hour (plus cooling time)
- Portion Size: Serves 12
- Complexity: Simple
Nutritional Recipe
- Calories per portion: Approximately 350
- Protein: 3g
- Carbs: 50g
- Fats: 17g
- Fiber: 1g
- Sugars: 30g
- Sodium: 300mg
Why You’ll Love This Old Fashioned Red Velvet Cake
This cake is the epitome of comfort food, with its rich red hue and creamy frosting drawing you in for a slice. It’s versatile enough to serve at fancy gatherings or simple family dinners, and each bite is a delightful mix of moist cake and tangy cream cheese frosting. Plus, the tradition behind it makes it even more special – it’s a cake that tells a story as much as it pleases the palate.
The Complete Cooking Journey
From measuring and mixing to the sweet moments where you sneak spoonfuls of batter, this recipe engages all the senses. The vibrant red color emerging from the oven is a visual treat, while the luscious cream cheese frosting adds the perfect finishing touch. No matter if you’re a seasoned baker or a novice in the kitchen, this Red Velvet Cake invites you to create something beautiful and scrumptious.
Ingredients:
- 2 1/2 cups all-purpose flour
- 1 1/2 cups granulated sugar
- 1 teaspoon baking soda
- 1 teaspoon salt
- 1 teaspoon cocoa powder
- 1 cup vegetable oil
- 1 cup buttermilk, room temperature
- 2 large eggs, room temperature
- 2 tablespoons red food coloring
- 1 teaspoon vanilla extract
- 1 teaspoon white vinegar
Method:
Step 1: Preheat Your Oven
Preheat the oven to 350°F (175°C). Grease and flour two 9-inch round cake pans.
Step 2: Sift the Dry Ingredients
In a large mixing bowl, sift together the flour, sugar, baking soda, salt, and cocoa powder. This process not only combines the ingredients but also aerates them for lighter cake layers.
Step 3: Whisk the Wet Ingredients
In another bowl, whisk together the oil, buttermilk, eggs, food coloring, vanilla extract, and vinegar until well combined. This vibrant mixture will give your cake its signature color and moistness.
Step 4: Combine Wet and Dry
Gradually add the wet ingredients to the dry ingredients, mixing until smooth. Be careful not to overmix; a few lumps are perfectly fine!
Step 5: Prepare the Cake Pans
Divide the batter equally between the prepared cake pans and smooth the tops with a spatula.
Step 6: Bake the Cakes
Bake for 25-30 minutes, or until a toothpick inserted in the center comes out clean. The cakes should spring back when lightly touched.
Step 7: Cool the Cakes
Allow the cakes to cool in the pans for 10 minutes, then turn them out onto wire racks to cool completely. This step is crucial; frosting a warm cake can lead to a messy situation!
Step 8: Frosting Time!
Once cooled, frost with your favorite cream cheese frosting. The tangy frosting complements the sweetness of the cake perfectly.
Serving Suggestions & Pairings
This Old Fashioned Red Velvet Cake is splendid served on its own, but it pairs beautifully with a hot cup of coffee or a chilled glass of milk. Serve it with fresh berries on the side, or even a scoop of vanilla ice cream for an indulgent dessert experience.
Storage & Leftovers Guide
To store your cake, keep it in an airtight container in the refrigerator for up to a week. You can also freeze unfrosted cake layers for up to three months – just wrap them tightly in plastic wrap, then foil. Thaw in the fridge overnight before frosting.
Kitchen Wisdom & Success Tips
- Room Temperature Ingredients: Always use room temperature eggs and buttermilk for better emulsification.
- Gel vs. Liquid Food Coloring: For vibrant color, gel food coloring is often preferred as it doesn’t add much liquid to the batter.
- Don’t Overmix: A gentle hand in mixing will keep your cake light and fluffy.
- Make It Ahead: Bake your cake layers a day in advance; wrapped tightly, they stay moist and flavorful.
Flavor Variations & Adaptations
You can add citrus zest to the batter for a fresh twist or try substituting half the oil with unsweetened applesauce for a lighter version. To elevate the flavor, consider adding a hint of almond extract along with the vanilla.
Reader Questions & Solutions
- Why did my cake rise unevenly? Make sure your oven is calibrated correctly and the cake pans are placed in the center of the oven for even heat distribution.
- How can I make my cake more chocolatey? Add a tablespoon or two of cocoa powder to the batter, balancing it out with a bit more sugar.
- What’s the best way to frost a layered cake? Crumb coat first! Apply a thin layer of frosting to seal in crumbs, chill it for a bit, and then frost regularly over it.
- How do I know when my cake is done? Aside from the toothpick test, the cake should look slightly domed and spring back when touched.
- Can I use different types of flour? While all-purpose flour is best here, you can try using half whole wheat for a nuttier flavor.
Wrapping Up
I hope this Old Fashioned Red Velvet Cake finds its way into your kitchen and hearts, just like it has in mine. It’s more than just a dessert; it’s a sweet tradition full of love and joy. So gather your ingredients, put on your apron, and let’s create something delicious together! Happy baking!
PrintOld Fashioned Red Velvet Cake
A classic Red Velvet Cake that combines tender texture and rich flavor, perfect for any celebration.
- Prep Time: 20 minutes
- Cook Time: 30 minutes
- Total Time: 50 minutes
- Yield: 12 servings 1x
- Category: Dessert
- Method: Baking
- Cuisine: American
- Diet: Vegetarian
Ingredients
- 2 1/2 cups all-purpose flour
- 1 1/2 cups granulated sugar
- 1 teaspoon baking soda
- 1 teaspoon salt
- 1 teaspoon cocoa powder
- 1 cup vegetable oil
- 1 cup buttermilk, room temperature
- 2 large eggs, room temperature
- 2 tablespoons red food coloring
- 1 teaspoon vanilla extract
- 1 teaspoon white vinegar
Instructions
- Preheat the oven to 350°F (175°C). Grease and flour two 9-inch round cake pans.
- Sift together the flour, sugar, baking soda, salt, and cocoa powder in a large mixing bowl.
- Whisk together the oil, buttermilk, eggs, food coloring, vanilla extract, and vinegar in another bowl.
- Combine the wet ingredients with the dry ingredients, mixing until smooth.
- Prepare the cake pans by dividing the batter equally and smoothing the tops.
- Bake for 25-30 minutes, or until a toothpick inserted comes out clean.
- Cool the cakes in the pans for 10 minutes, then transfer to wire racks to cool completely.
- Frost with your favorite cream cheese frosting once cooled.
Notes
Serve with coffee or milk, and consider adding fresh berries or ice cream.
Nutrition
- Serving Size: 1 slice
- Calories: 350
- Sugar: 30g
- Sodium: 300mg
- Fat: 17g
- Saturated Fat: 4g
- Unsaturated Fat: 10g
- Trans Fat: 0g
- Carbohydrates: 50g
- Fiber: 1g
- Protein: 3g
- Cholesterol: 30mg