

Growing up, my grandmother would whip up (in more ways than one) her famous banana pudding for every family gathering. The kitchen would hum with the sounds of laughter and sweet aromas, and her pudding was always the star of the show. Soft layers of creamy vanilla, ripe bananas, and crunchy wafers worked their magic, conjuring a delightful nostalgia. Now, inspired by the famous Magnolia Bakery’s rendition, I’m excited to share my Addictive Banana Pudding Recipe, bringing those beautiful memories right into your home!
Recipe Timing
- Prep Duration: 20 minutes
- Active Cooking: 10 minutes
- Total Duration: 4 hours (including chilling time)
- Portion Size: Serves 8-10
- Complexity: Simple
Nutritional Recipe
- Calories per portion: 430 calories
- Protein: 6 g
- Carbs: 67 g
- Fats: 18 g
- Fiber: 2 g
- Sugars: 32 g
- Sodium: 160 mg
Why You’ll Love This Addictive Banana Pudding Recipe Inspired by Magnolia Bakery
This creamy dessert embodies comfort. Every spoonful delivers a perfectly balanced taste of sweet, creamy, and crunchy that makes you come back for seconds (and maybe thirds!). The whipped cream adds a luscious touch, while the bananas bring a natural sweetness that ties everything together. It’s not just pudding; it’s a nostalgic experience that can brighten anyone’s day. Plus, it’s an incredibly easy recipe that even kitchen newcomers can master!
The Complete Cooking Journey
Getting into this banana pudding adventure requires just a handful of simple ingredients and a little bit of love. The joy lies in layering the flavors, allowing them to meld together in a way that is nothing short of magical.
Ingredients:
- 396 g condensed milk (14 oz)
- 1.5 cups ice cold water
- 96 g vanilla pudding (1 box, 3.4 oz)
- 3 cups whipping cream (35% fat)
- 4 cups sliced bananas (4 to 6 bananas)
- 680 g vanilla wafers (2 boxes, 12 oz boxes)
Method:
### Step 1: Prepare the Pudding Mixture
In a large mixing bowl, combine the condensed milk and ice cold water, whisking until smooth. Gradually add the vanilla pudding mix, whisking vigorously for about 2 minutes until the mixture thickens and is well combined.
### Step 2: Whip the Cream
In a separate bowl, use an electric mixer to whip the cream until soft peaks form. This usually takes about 3-5 minutes. Be careful not to overwhip; we want it fluffy, not butter!
### Step 3: Combine Mixtures
Gently fold the whipped cream into the pudding mixture using a spatula. Be thorough but gentle to maintain the cream’s light texture that brings joy in each layer.
### Step 4: Layering Begins
In a large trifle dish or individual serving cups, start by placing a layer of vanilla wafers at the bottom. Then, add a layer of the pudding mixture over the wafers.
### Step 5: Add the Bananas
Next, evenly distribute a layer of sliced bananas over the pudding. Trust me, this adds a delightful burst of flavor that pairs beautifully with the creamy layers.
### Step 6: Repeat the Layers
Repeat the layering process—starting with more wafers, followed by the pudding mixture, and then banana slices—until you fill your dish. Aim for 2-3 layers, depending on your dish size.
### Step 7: Chill the Pudding
Cover the dish with plastic wrap and place it in the refrigerator. Chill for at least 4 hours to let the flavors meld beautifully. If you can wait overnight, it’s even better!
### Step 8: Serve and Enjoy
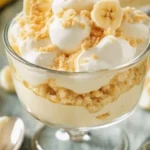
Once chilled and ready to go, scoop out generous servings of your banana pudding, ensuring each bowl has layers of pudding, wafers, and bananas. Grab a fork, dig in, and enjoy the compliments!
Serving Suggestions & Pairings
Serve this banana pudding as a stand-alone dessert, or pair it with a slice of warm chocolate cake or a scoop of vanilla ice cream for an extra indulgent treat. A cup of coffee or chilled glass of sweet tea can elevate your dessert time too!
Storage & Leftovers Guide
This banana pudding is best enjoyed fresh, but it will keep well in the fridge for 2-3 days. Store in an airtight container for the best preservation, but keep in mind the wafers may become softer over time.
Kitchen Wisdom & Success Tips
- Banana Brownness: Select bananas that are ripe but not overly brown. They should hold their shape in the pudding while still being sweet.
- Whipping Cream: Make sure your mixing bowl and beaters are cold to achieve the best whip.
- Layering Technique: For aesthetics, try to place the ingredients symmetrically in the dish; it makes for a more visually appealing dessert.
- Make Ahead: This dessert can be made a day in advance, allowing the flavors to deepen and the textures to balance perfectly.
Flavor Variations & Adaptations
Feeling adventurous? Try adding a layer of crushed pineapple for a tropical twist, or swap out vanilla wafers for chocolate ones to create a chocolate-banana pudding. You can also sprinkle in some chopped nuts for added crunch!
Reader Questions & Solutions
-
Can I use instant pudding instead of cooked pudding?
Yes! To save time, instant pudding will work just as well. Just whip it according to the package instructions and fold it in with the whipped cream. -
What can I substitute for whipped cream?
You can use whipped coconut cream or store-bought whipped topping for a dairy-free option. -
How do I keep bananas from browning?
You can toss banana slices with a bit of lemon juice to slow down the browning process. -
Can I freeze the pudding?
It’s not recommended to freeze the banana pudding because bananas and whipped cream can change texture when thawed, but you can freeze the pudding mixture without bananas for up to a month. -
How can I make this gluten-free?
Substitute regular vanilla wafers with gluten-free wafers, and you’ll have a delicious gluten-free dessert!
Wrapping Up
This Addictive Banana Pudding Recipe is more than just a treat—it’s a bridge connecting memories and flavors that bring smiles and warmth to our gatherings. I hope you find joy in creating this delightful dessert and that it becomes as special to you and your loved ones as it is to me. Let’s keep the kitchen buzzing with happiness—grab those bananas and get started on this delicious journey! Happy cooking!
PrintAddictive Banana Pudding
A nostalgic banana pudding recipe inspired by Magnolia Bakery, featuring layers of creamy vanilla, ripe bananas, and crunchy wafers.
- Prep Time: 20 minutes
- Cook Time: 10 minutes
- Total Time: 240 minutes
- Yield: 8-10 servings 1x
- Category: Dessert
- Method: Chilling
- Cuisine: American
- Diet: Vegetarian
Ingredients
- 396 g condensed milk (14 oz)
- 1.5 cups ice cold water
- 96 g vanilla pudding (1 box, 3.4 oz)
- 3 cups whipping cream (35% fat)
- 4 cups sliced bananas (4 to 6 bananas)
- 680 g vanilla wafers (2 boxes, 12 oz boxes)
Instructions
- Prepare the pudding mixture: In a large mixing bowl, combine the condensed milk and ice cold water, whisking until smooth. Gradually add the vanilla pudding mix, whisking vigorously for about 2 minutes until the mixture thickens and is well combined.
- Whip the cream: In a separate bowl, use an electric mixer to whip the cream until soft peaks form, about 3-5 minutes.
- Combine mixtures: Gently fold the whipped cream into the pudding mixture using a spatula.
- Layering begins: In a large trifle dish or individual serving cups, start by placing a layer of vanilla wafers at the bottom, followed by a layer of pudding mixture.
- Add the bananas: Evenly distribute a layer of sliced bananas over the pudding.
- Repeat the layers: Continue layering with more wafers, pudding mixture, and banana slices until your dish is full, aiming for 2-3 layers.
- Chill the pudding: Cover with plastic wrap and refrigerate for at least 4 hours to let the flavors meld.
- Serve and enjoy: Once chilled, scoop out servings ensuring each bowl has layers of pudding, wafers, and bananas.
Notes
Store leftovers in an airtight container for 2-3 days; wafers may become softer over time. For a gluten-free option, use gluten-free wafers.
Nutrition
- Serving Size: 1 serving
- Calories: 430
- Sugar: 32g
- Sodium: 160mg
- Fat: 18g
- Saturated Fat: 10g
- Unsaturated Fat: 8g
- Trans Fat: 0g
- Carbohydrates: 67g
- Fiber: 2g
- Protein: 6g
- Cholesterol: 40mg


