
There’s something magical about the act of sharing food; it warms hearts and forms connections. One of my most treasured memories is of bustling kitchens filled with the sweet, buttery scent of kunafa baking, the sound of laughter echoing as family gathered around the dining table, eyes gleaming with anticipation. Kunafa—traditionally a show-stopping dessert of the Middle Eastern cuisine—holds a special place in my heart. It reminds me of my late grandmother, who would spend hours in the kitchen, her hands deftly working the delicate strands of kataifi dough. Watching her create this crispy delight was like seeing art come to life.
Today, I’m excited to share an Easy Kunafa Recipe with Mozzarella Cheese that captures that nostalgia! This version combines the traditional method with a gooey mozzarella filling, creating a luscious contrast to the crispy exterior. I can’t wait for you to experience the joy of this dessert, which is not just a treat but a shared moment of bliss.
Recipe Timing
- Prep Duration: 30 minutes
- Active Cooking: 50 minutes
- Total Duration: 1 hour 20 minutes
- Portion Size: Serves 8-10
- Complexity: Simple
Nutritional Recipe
- Calories per portion: Approximately 450
- Protein: 7g
- Carbs: 52g
- Fats: 24g
- Fiber: 1g
- Sugars: 22g
- Sodium: 400mg
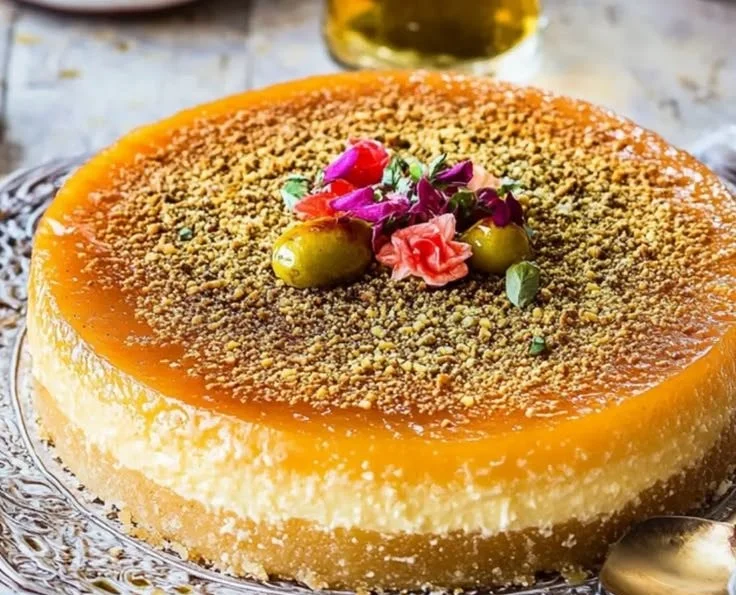
Why You’ll Love This Easy Kunafa Recipe with Mozzarella Cheese for a Crispy Delight
Imagine sinking your fork into a perfectly baked slice of kunafa, a delectable layer of crispy, golden kataifi dough cradling a warm, stretchy mozzarella cheese filling. The moment you take a bite, the flavors dance on your palate. The slight sweetness of the syrup combined with the nuttiness of the pistachios and the floral notes of rose water encapsulate the essence of what dessert should be—joyous and hedonistic. This recipe is straightforward and allows you to create authentic kunafa right in your kitchen, perfect for special occasions or a cozy night in.
The Complete Cooking Journey
Now let’s embark on this journey together, step by step—making something beautiful and delicious right at home.
Ingredients:
- 2 1/2 cups sugar
- 1 1/4 cups water
- 1 tablespoon rose water or orange blossom water (optional)
- 1 squeeze lemon juice
- 454 g Kataifi Dough (shredded phyllo dough)
- 1 cup melted butter
- 600 g mozzarella cheese (high moisture, at least 50%)
- 170 ml thick cream
- 1/2 cup crushed pistachios (to garnish)
- 2 tablespoons dry rose petals (for garnish, optional)
Method:
Step 1: Prepare the Simple Syrup
In a medium saucepan, combine the water, sugar, and a squeeze of lemon juice, placing it on high heat. Allow it to come to a boil. Once boiling, lower the heat to medium and let it simmer for 10 minutes. Turn off the heat and add the tablespoon of rose water at the end if you’re using it, allowing it to cool to room temperature.
Step 2: Thaw the Kataifi Dough
Take out the frozen kataifi dough and leave it on the counter to thaw for about an hour. Preheat your oven to 350°F (175°C) while it’s thawing.
Step 3: Prepare the Cheese Mixture
Shred the mozzarella cheese or cut it into small cubes, and mix it well with thick cream. This will create a creamy filling that melts delightfully in the oven.
Step 4: Break Up the Kataifi Dough
Break apart the kataifi dough and place it in a food processor. Whiz it for a few seconds until it is broken up into small, manageable pieces.
Step 5: Enrich the Dough with Butter
In a large bowl, place the shredded kataifi dough and pour over the melted butter. Using your hands, massage the butter into the dough, ensuring each strand is saturated and ready for baking.
Step 6: Prepare the Baking Pan
Brush the bottom of your pan with a bit of butter. You can use a 12-inch pan for a large kunafa or two 9-inch pans for individual ones.
Step 7: Form the Base Layer
Take half of the kataifi dough and pack it into the bottom of the pan using the flat bottom of a cup or your hands. Ensure you form a slight edge around the perimeter to hold the filling.
Step 8: Add the Cheese Filling
Spoon the cheesy mixture inside the dough crust you just created, spreading it out evenly for a deliciously gooey center.
Step 9: Top with Remaining Dough
Take the remaining kataifi dough and spread it over the cheese layer, covering it entirely and packing it in lightly.
Step 10: Bake to Perfection
Bake for 40-50 minutes or until the top is deeply golden and crispy, filling your kitchen with an irresistible aroma.
Step 11: Drizzle with Simple Syrup
As soon as it comes out of the oven, drizzle about 3/4 of the prepared simple syrup over the kunafa, making sure to cover the full surface. Set aside some syrup for serving.
Step 12: Cool and Invert
Allow the kunafa to cool and soak in the syrup for about 10 minutes. Then, carefully invert it onto a serving platter.
Step 13: Garnish and Serve
Garnish with the crushed pistachios and, if desired, sprinkle some dry rose petals on top. Cut into pieces and serve warm to your eager guests!
Serving Suggestions & Pairings
Kunafa pairs beautifully with a side of vanilla ice cream or a dollop of whipped cream. Pair it with a refreshing mint tea or a strong Turkish coffee to balance the sweetness, turning every bite into an unforgettable experience.
Storage & Leftovers Guide
Leftover kunafa can be stored in an airtight container at room temperature for up to two days. If you need to keep it longer, refrigerate it for up to a week. Reheat in the oven to restore that crispy texture!
Kitchen Wisdom & Success Tips
- Use High-Quality Cheese: A high-moisture mozzarella is key for a gooey interior.
- Massage the Butter Well: This is vital for achieving that perfect crispy texture for the kataifi.
- Don’t Rush the Syrup: Allow the syrup to cool naturally; it helps it soak better into the kunafa.
Flavor Variations & Adaptations
For a different twist, try adding a layer of chocolate spread, or complement the kunafa with a mix of cream cheese and mascarpone for a richer filling. You could also sprinkle cinnamon or nutmeg for added warmth.
Reader Questions & Solutions
-
What if my kunafa isn’t crispy? Ensure you use enough butter and bake it until deeply golden; the longer baking time helps create the crispiness.
-
Can I use other types of cheese? Yes, feel free to experiment with mixtures! Some might also enjoy a blend with ricotta for added creaminess.
-
How do I fix dry kunafa? If your leftovers are dry, drizzle a little warm milk or syrup on top before reheating.
-
Is it possible to prepare this ahead of time? Definitely! You can assemble it a day before baking; just cover it and keep it in the fridge.
-
How can I make a vegan version? Substitute the butter with coconut oil and use plant-based cheese alternatives along with a dairy-free cream.
Wrapping Up
I hope you feel inspired to embark on this culinary adventure and experience the magic of kunafa. Each slice is not just a dessert; it’s a piece of tradition, a labor of love, and a beautiful way to create memories. Embrace the process, gather your loved ones, and enjoy every delightful bite. Happy cooking!
PrintEasy Kunafa Recipe with Mozzarella Cheese
This Easy Kunafa Recipe combines crispy kataifi dough with gooey mozzarella cheese for a delightful dessert experience.
- Prep Time: 30 minutes
- Cook Time: 50 minutes
- Total Time: 80 minutes
- Yield: 8-10 servings 1x
- Category: Dessert
- Method: Baking
- Cuisine: Middle Eastern
- Diet: Vegetarian
Ingredients
- 2 1/2 cups sugar
- 1 1/4 cups water
- 1 tablespoon rose water or orange blossom water (optional)
- 1 squeeze lemon juice
- 454 g kataifi dough (shredded phyllo dough)
- 1 cup melted butter
- 600 g mozzarella cheese (high moisture, at least 50%)
- 170 ml thick cream
- 1/2 cup crushed pistachios (to garnish)
- 2 tablespoons dry rose petals (for garnish, optional)
Instructions
- Prepare the Simple Syrup: In a medium saucepan, combine the water, sugar, and a squeeze of lemon juice, placing it on high heat. Allow it to come to a boil. Once boiling, lower the heat to medium and let it simmer for 10 minutes. Turn off the heat and add the tablespoon of rose water at the end if you’re using it, allowing it to cool to room temperature.
- Thaw the Kataifi Dough: Take out the frozen kataifi dough and leave it on the counter to thaw for about an hour. Preheat your oven to 350°F (175°C) while it’s thawing.
- Prepare the Cheese Mixture: Shred the mozzarella cheese or cut it into small cubes, and mix it well with thick cream.
- Break Up the Kataifi Dough: Break apart the kataifi dough and place it in a food processor. Whiz it for a few seconds until it is broken up into small, manageable pieces.
- Enrich the Dough with Butter: In a large bowl, place the shredded kataifi dough and pour over the melted butter. Using your hands, massage the butter into the dough.
- Prepare the Baking Pan: Brush the bottom of your pan with a bit of butter.
- Form the Base Layer: Take half of the kataifi dough and pack it into the bottom of the pan.
- Add the Cheese Filling: Spoon the cheesy mixture inside the dough crust you just created, spreading it out evenly.
- Top with Remaining Dough: Take the remaining kataifi dough and spread it over the cheese layer, covering it entirely.
- Bake to Perfection: Bake for 40-50 minutes or until the top is deeply golden and crispy.
- Drizzle with Simple Syrup: As soon as it comes out of the oven, drizzle about 3/4 of the prepared simple syrup over the kunafa.
- Cool and Invert: Allow the kunafa to cool and soak in the syrup for about 10 minutes, then carefully invert it onto a serving platter.
- Garnish and Serve: Garnish with the crushed pistachios and sprinkle some dry rose petals on top. Cut into pieces and serve warm.
Notes
Kunafa pairs beautifully with vanilla ice cream or a dollop of whipped cream. Store leftovers in an airtight container for up to two days.
Nutrition
- Serving Size: 1 serving
- Calories: 450
- Sugar: 22g
- Sodium: 400mg
- Fat: 24g
- Saturated Fat: 14g
- Unsaturated Fat: 10g
- Trans Fat: 0g
- Carbohydrates: 52g
- Fiber: 1g
- Protein: 7g
- Cholesterol: 60mg


