
Chocolate and peanut butter—the ultimate dynamic duo that tempts taste buds and evokes happy childhood memories. I remember the first time I tried this perfectly indulgent combo in a simple sandwich, the gooeyness of the peanut butter melding beautifully with the sweetness of chocolate spread. Fast forward to my adventures in the kitchen, and you’ll find that comfort food has evolved into something even more delightful. Enter the Chocolate Peanut Butter Ooey Gooey Cake—where rich chocolate cake meets a luscious peanut butter twist that will spark joy in every bite. Buckle up as we dive into a sweet creation that promises to be an instant favorite, perfect for gatherings or simply indulging yourself after a long day.
Recipe Timing
- Prep Duration: 15 minutes
- Active Cooking: 35-40 minutes
- Total Duration: 50-55 minutes (plus cooling time)
- Portion Size: 12 servings
- Complexity: Simple
Nutritional Recipe
- Calories per portion: Approximately 350 calories
- Protein: 7 grams
- Carbs: 44 grams
- Fats: 17 grams
- Fiber: 1 gram
- Sugars: 20 grams
- Sodium: 250 mg
Why You’ll Love This Chocolate Peanut Butter Ooey Gooey Cake
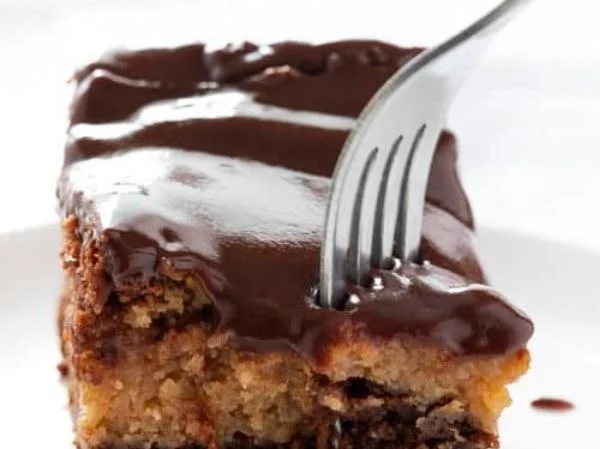
This cake is not just a dessert; it’s an experience! The Chocolate Peanut Butter Ooey Gooey Cake seamlessly combines the depth of rich chocolate with the creamy, nutty flavor of peanut butter, all while offering a satisfying contrast in textures. It’s soft, moist, and delightfully sticky—a true testament to comfort food at its finest. Perfect for celebrations or as an after-dinner treat, this cake receives rave reviews from friends and family alike. One slice and you’ll find yourself lost in a blissful chocolate-peanut butter reverie!
The Complete Cooking Journey
The journey of making this ooey gooey cake is almost as delightful as savoring the final product. Begin by gathering your ingredients—each step is simple and involves a lot of mixing and pouring, allowing you to indulge in the joy of baking. Once out of the oven, you’ll be left with a gorgeous cake just waiting to be draped in a creamy ganache that completes this decadent masterpiece. You’ll soon find yourself not just baking, but creating fond memories to share.
Ingredients:
- 1 box chocolate cake mix
- 1 cup creamy peanut butter
- 3 eggs
- 1/2 cup vegetable oil
- 1 cup water
- 1 cup powdered sugar
- 1 cup chocolate chips
- 1/2 cup heavy cream
Method:
Step 1: Preheat the Oven
Preheat your oven to 350°F (175°C). Don’t forget to grease and flour a cake pan; this will help ensure your cake releases smoothly when it’s done!
Step 2: Mix the Batter
In a large bowl, combine the chocolate cake mix, creamy peanut butter, eggs, vegetable oil, and water. Mix everything together until it’s nice and smooth—this can be done by hand or with a hand mixer for a fluffier texture.
Step 3: Bake
Pour the batter into your prepared cake pan, spreading it evenly. Bake in the preheated oven for about 30-35 minutes or until a toothpick inserted into the center comes out clean. The aroma filling your kitchen is heavenly!
Step 4: Make the Ganache
While the cake cools, let’s whip up a delicious ganache. In a separate bowl, combine the powdered sugar, chocolate chips, and heavy cream. Stir until the mixture is smooth and glossy.
Step 5: Drizzle the Ganache
Once the cake has cooled completely, place it on a serving plate. Carefully pour the ganache over the top, using a spatula to spread it evenly. This step adds that beautiful, shiny finish.
Step 6: Set and Serve
Allow the ganache to set for a few minutes before slicing into the cake. Patience is key here, but trust me, it will be worth it when you take that first blissful bite!
Serving Suggestions & Pairings
This cake is perfect served on its own, but to elevate the experience, consider pairing it with a scoop of vanilla ice cream or a dollop of whipped cream. Fresh strawberries or raspberries also make for a lovely contrast to the chocolate and peanut butter flavors. Additionally, a drizzle of caramel sauce adds another layer of dewy decadence.
Storage & Leftovers Guide
If you have any leftovers (which is rare!), store them in an airtight container at room temperature for up to 3 days. For longer storage, you can refrigerate for up to a week, though the cake may dry out slightly. To enjoy later, consider reheating individual slices in the microwave for a warm, gooey experience.
Kitchen Wisdom & Success Tips
- Ensure all your ingredients are at room temperature before you start: this helps create a smoother batter.
- Don’t overmix once you’ve added the wet ingredients; mix just until incorporated to keep the cake tender.
- For an extra boost of flavor, try adding a pinch of espresso powder to the chocolate batter for a deeper chocolate taste!
Flavor Variations & Adaptations
Feel free to experiment! You can swap in a different type of nut butter if you’re not a peanut butter fan—almond or cashew butter will still yield delicious results. Additionally, try adding some chopped nuts, like peanuts or walnuts, into the batter for added texture.
Reader Questions & Solutions
-
Can I use natural peanut butter?
Yes, natural peanut butter works, but it may result in a drier cake. Make sure to mix it well! -
What can I use instead of eggs?
Flax eggs (1 tablespoon ground flaxseed + 2.5 tablespoons water per egg) can be a great substitute for a vegan version. -
Will this cake work in a different pan?
Absolutely! Just adjust the baking time as necessary; smaller or larger pans may cook faster or slower. -
Can I freeze this cake?
Yes! Wrap the cooled cake well in plastic wrap and foil before freezing it. It should last for up to 3 months. Thaw in the fridge before enjoying. -
How do I fix a dry cake?
Always refer to the baking time for your specific oven. If it’s dry, try checking the cake about 5 minutes earlier next time!
Wrapping Up
As you step back to admire your Chocolate Peanut Butter Ooey Gooey Cake—with its shiny ganache and tantalizing aroma—take a moment to appreciate the journey you just made. This cake isn’t just about satisfying a sweet tooth; it’s about creating lasting memories, whether you’re indulging solo or sharing with loved ones. Embrace the joy of baking, let the flavors mingle, and prepare to embark on a delicious adventure. Trust me, once you try this recipe, you’ll want it as a staple in your dessert repertoire. Happy baking!
PrintChocolate Peanut Butter Ooey Gooey Cake
Indulge in the delightful combination of rich chocolate and creamy peanut butter with this soft, moist, and delightfully sticky cake.
- Prep Time: 15 minutes
- Cook Time: 35 minutes
- Total Time: 50 minutes
- Yield: 12 servings 1x
- Category: Dessert
- Method: Baking
- Cuisine: American
- Diet: Vegetarian
Ingredients
- 1 box chocolate cake mix
- 1 cup creamy peanut butter
- 3 eggs
- 1/2 cup vegetable oil
- 1 cup water
- 1 cup powdered sugar
- 1 cup chocolate chips
- 1/2 cup heavy cream
Instructions
- Preheat your oven to 350°F (175°C). Grease and flour a cake pan.
- Mix in a large bowl the chocolate cake mix, creamy peanut butter, eggs, vegetable oil, and water until smooth.
- Pour the batter into your prepared cake pan and bake for about 30-35 minutes or until a toothpick comes out clean.
- Combine the powdered sugar, chocolate chips, and heavy cream in a bowl to make the ganache.
- Pour the ganache over the cooled cake and spread evenly.
- Allow the ganache to set before slicing and serving.
Notes
Pair with vanilla ice cream or fresh berries for an enhanced experience. Store leftovers in an airtight container.
Nutrition
- Serving Size: 1 slice
- Calories: 350
- Sugar: 20g
- Sodium: 250mg
- Fat: 17g
- Saturated Fat: 7g
- Unsaturated Fat: 10g
- Trans Fat: 0g
- Carbohydrates: 44g
- Fiber: 1g
- Protein: 7g
- Cholesterol: 90mg


