
When I think of the holidays, my mind turns to the warm, buttery scents wafting through the kitchen, the laughter shared over bowls of dough and the excitement that comes with decorating cookies. One recipe that never fails to bring a spark of joy and creativity to my baking is Stained Glass Cookies. A simple yet stunning treat, these colorful cookies not only look beautiful but also capture the spirit of togetherness and celebration. As we get our hands sticky with dough and our imaginations running wild with colors and shapes, I can’t help but get giddy at the thought of sharing these delectable gems with family and friends.
## Recipe Timing
- Prep Duration: 30 minutes
- Active Cooking: 10 minutes
- Total Duration: 40 minutes
- Portion Size: About 24 cookies
- Complexity: Simple
## Nutritional Recipe
- Calories per portion: 90
- Protein: 1g per serving
- Carbs: 12g per serving
- Fats: 4g per serving
- Fiber: 0g per serving
- Sugars: 6g per serving
- Sodium: 60mg per serving
## Why You’ll Love This Stained Glass Cookies
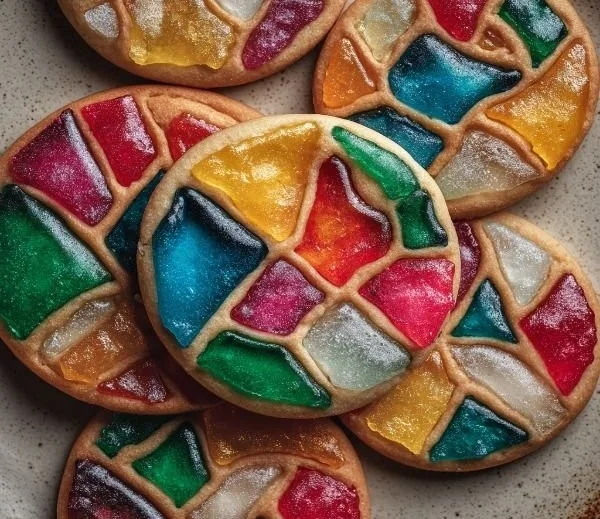
Stained Glass Cookies are not just any ordinary cookie; they are a colorful delight that combines both the classic flavors of sugar cookies and a visual twist that catches the eye. The melted candies create a breathtaking stained glass effect that looks gorgeous on any dessert table. Plus, they are a fantastic opportunity to get creative in the kitchen—mix and match colors, experiment with shapes, and let the kids join in the fun! The warm, sweet aroma of vanilla and buttery goodness comes together beautifully, making these cookies memorable both in taste and presentation.
## The Complete Cooking Journey
Baking Stained Glass Cookies is as rewarding as it is fun. From creaming the butter and sugar to watching the candies melt like magic in the oven, every step is a delightful experience. The process is not just about the end product; it’s about the memories created along the way. You’ll find joy in rolling out the dough and the simple satisfaction of cutting out intricate shapes. And let’s not forget the pure delight that comes from popping the cookies in the oven and anticipating the moment when you’ll unveil these colorful treats!
## Ingredients:
- 1 cup unsalted butter, softened
- 1 cup granulated sugar
- 1 large egg
- 1 teaspoon vanilla extract
- 2 1/2 cups all-purpose flour
- 1 teaspoon baking powder
- 1/2 teaspoon salt
- 1 1/2 cups crushed hard candies (such as Jolly Ranchers, in assorted colors)
- Optional: food coloring for dough
## Method:
### Step 1: Preheat Your Oven
Start by preheating your oven to 350°F (175°C). This step ensures that your cookies bake evenly and come out perfectly golden.
### Step 2: Prepare Baking Sheets
Line two baking sheets with parchment paper and set them aside. This will help prevent any sticky disasters later on!
### Step 3: Cream Butter and Sugar
In a large mixing bowl, cream together the softened butter and granulated sugar until the mixture is light and fluffy. This should take about 3-5 minutes with an electric mixer on medium speed. Your muscles might get a workout, but the results will be worth it!
### Step 4: Add Egg and Vanilla
Beat in the egg and vanilla extract, mixing until well combined. The sweet, vanilla-scented aroma will fill your kitchen!
### Step 5: Combine Dry Ingredients
In a separate bowl, whisk together the all-purpose flour, baking powder, and salt. Gradually add the dry ingredients to the wet ingredients, mixing on low speed until just combined. Don’t overmix—the dough needs a gentle hand.
### Step 6: Add Color (Optional)
If desired, divide the dough into portions and add a few drops of food coloring to each portion, kneading the color in until evenly mixed. This is where the fun really begins—let your creativity shine!
### Step 7: Chill the Dough
Chill the dough in the refrigerator for about 30 minutes to make it easier to roll out. This step is crucial for preventing the cookies from spreading too much in the oven.
### Step 8: Roll Out the Dough
Once chilled, roll out the dough on a generously floured surface to about 1/4-inch thickness. Keep it uniform to ensure even baking.
### Step 9: Cut Out Cookies
Use cookie cutters in various shapes to cut out cookies. Feel free to use holiday-themed cutters or any fun shapes that inspire you.
### Step 10: Create Windows
Use a smaller cookie cutter or the end of a piping tip to cut out the center of each cookie, creating a window effect. Save these smaller cutouts for nibbling later!
### Step 11: Fill with Candy
Place the cookies onto the prepared baking sheets, leaving some space between each one. Place crushed hard candies into the center of each cookie, filling the cut-out spaces for the stained glass effect.
### Step 12: Bake the Cookies
Bake in the preheated oven for about 8-10 minutes, or until the edges are lightly golden and the candies have melted into a vibrant, glass-like center.
### Step 13: Cool Down
Allow cookies to cool on the baking sheets for a few minutes before transferring them to wire racks to cool completely. The hard candy will harden as they cool, solidifying that beautiful stained glass effect.
## Serving Suggestions & Pairings
These Stained Glass Cookies are perfect for any festive occasion, but why stop there? Serve them alongside hot cocoa, festive teas, or a scoop of vanilla ice cream for a delightful dessert platter. They also make excellent gifts wrapped in clear bags tied with a colorful ribbon!
## Storage & Leftovers Guide
Store your cookies in an airtight container at room temperature for up to one week. You can also freeze them for up to three months—just ensure they are well-wrapped to prevent freezer burn!
## Kitchen Wisdom & Success Tips
- Ensure your butter is truly softened for the best creaming results. Leave it out at room temperature for about an hour before starting.
- To avoid your candies melting into a puddle, you can pulse them in a food processor for finer pieces, or just crush them gently with a rolling pin in a ziplock bag.
- Don’t skip the chilling step! This truly helps maintain their shape while baking.
## Flavor Variations & Adaptations
Feeling adventurous? Try adding citrus zest to the dough for a hint of flavor, or swap out the hard candies for chocolate chips or nuts for a different experience. You could also experiment with flavored extracts like almond or peppermint!
## Reader Questions & Solutions
-
My cookies spread too much! What did I do wrong?
- Make sure your butter is softened, not melted, and chill your dough adequately.
-
Can I use other types of candies?
- Yes, just avoid chocolate as it won’t create the stained glass effect. Use hard candies that melt well.
-
How do I prevent my cookies from sticking?
- Use parchment paper or lightly grease your baking sheet. Ensure your dough is well-floured when rolling it out.
-
Can I freeze the dough?
- Absolutely! You can freeze the dough before or after cutting out the cookies. Just thaw it in the fridge before baking.
-
What can I do with leftover cookie scraps?
- Form them into balls and bake them as mini cookies, or roll them out again for more shapes!
## Wrapping Up
Baking Stained Glass Cookies is an experience filled with creativity and joy. It’s a wonderful way to connect with family, warm your home with sweet aromas, and indulge in delightful, colorful treats. As you venture into the kitchen to create your batch, remember to savor each step and let your creativity shine through. Happy baking!
PrintStained Glass Cookies

Colorful and creative cookies that capture the spirit of togetherness during the holidays.
- Prep Time: 30 minutes
- Cook Time: 10 minutes
- Total Time: 40 minutes
- Yield: 24 cookies 1x
- Category: Dessert
- Method: Baking
- Cuisine: American
- Diet: Vegetarian
Ingredients
- 1 cup unsalted butter, softened
- 1 cup granulated sugar
- 1 large egg
- 1 teaspoon vanilla extract
- 2 1/2 cups all-purpose flour
- 1 teaspoon baking powder
- 1/2 teaspoon salt
- 1 1/2 cups crushed hard candies (such as Jolly Ranchers, in assorted colors)
- Optional: food coloring for dough
Instructions
- Preheat your oven to 350°F (175°C).
- Line two baking sheets with parchment paper and set them aside.
- Cream together the softened butter and granulated sugar until light and fluffy.
- Beat in the egg and vanilla extract until well combined.
- In a separate bowl, whisk together the flour, baking powder, and salt. Gradually add to the wet ingredients, mixing on low speed until just combined.
- If desired, divide the dough and knead in food coloring.
- Chill the dough in the refrigerator for about 30 minutes.
- Roll out the dough on a floured surface to about 1/4-inch thickness.
- Use cookie cutters to cut out cookies.
- Create a window effect by cutting out the center of each cookie.
- Fill the cut-out spaces with crushed hard candies.
- Bake for 8-10 minutes, until edges are lightly golden and candies have melted.
- Allow to cool on baking sheets before transferring to wire racks.
Notes
Store cookies in an airtight container for up to one week or freeze for up to three months.
Nutrition
- Serving Size: 1 cookie
- Calories: 90
- Sugar: 6g
- Sodium: 60mg
- Fat: 4g
- Saturated Fat: 2g
- Unsaturated Fat: 2g
- Trans Fat: 0g
- Carbohydrates: 12g
- Fiber: 0g
- Protein: 1g
- Cholesterol: 30mg


