

When it comes to desserts that turn heads and tantalize taste buds, the Red Velvet Oreo Cheesecake is at the top of the list. I remember the first time I made this decadent delight—a Christmas gathering where the colors of red and white danced harmoniously on the table. The moment I cut through the creamy layer and revealed the luscious red hue beneath, a wave of anticipation rippled through my friends. With every bite, smiles widened and laughter erupted, making it clear that this cheesecake was a hit. It’s one of those recipes that seems to magically bring people together, creating moments of joy and connection over a shared love for indulgence.
Recipe Timing
- Prep Duration: 15 minutes
- Active Cooking: 20 minutes
- Total Duration: 4 hours (or overnight for best results)
- Portion Size: Serves 10-12
- Complexity: Moderate
Nutritional Recipe
- Calories per portion: Approximately 335
- Protein: 4g per serving
- Carbs: 34g per serving
- Fats: 21g per serving
- Fiber: 0g per serving
- Sugars: 17g per serving
- Sodium: 210mg per serving
Why You’ll Love This The Best Red Velvet Oreo Cheesecake
Red Velvet Oreo Cheesecake isn’t just a dessert; it’s an experience. The smooth and creamy cheesecake filling, enriched with the rich flavors of red velvet and the crunch of Oreo cookies, turns dessert time into a celebratory event. Not only does it look stunning, but every bite encapsulates holidays, celebrations, and cherished memories. Plus, it’s surprisingly easy to whip up, giving you the chance to charm friends and family with minimal effort!
The Complete Cooking Journey
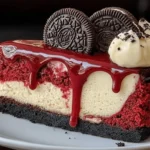
The journey begins by preparing the smooth red velvet crust that forms the foundation of this cheesecake. Next comes the tantalizing filling, which marries the tangy cream cheese with sweet whipped cream and the satisfying crunch of crushed Oreos. After pouring the filling onto the crust and allowing it to set in the refrigerator, the last step is the pièce de résistance: the gorgeous decoration with red velvet crumbs and whole Oreos that make this dessert a showstopper.
Ingredients:
- 2 cups red velvet cake mix
- 1/2 cup unsalted butter, melted
- 1 egg
- 16 oz cream cheese, softened
- 1 cup powdered sugar
- 1 teaspoon vanilla extract
- 2 cups whipped cream
- 1 package Oreo cookies, crushed
- For decoration: additional Oreo cookies and red velvet cake crumbs
Method:
Step 1: Preheat the Oven
Preheat your oven to 350°F (175°C). Greasing a 9-inch springform pan will ensure your cheesecake comes out smoothly.
Step 2: Make the Crust
In a bowl, mix the red velvet cake mix, melted butter, and egg until well combined. Press the mixture into the bottom of the prepared pan to form a crust.
Step 3: Bake the Crust
Bake the crust in the oven for 10-12 minutes, then let it cool completely before adding the filling.
Step 4: Beat the Cream Cheese
In another bowl, beat the cream cheese until it’s smooth and creamy. Add the powdered sugar and vanilla extract, mixing until well incorporated.
Step 5: Incorporate the Whipped Cream
Gently fold in the whipped cream and the crushed Oreo cookies until they’re thoroughly combined with the cream cheese mixture.
Step 6: Pour the Filling
Once your crust is cool, pour the cheesecake mixture over the crust and smooth the top with a spatula for a nice finish.
Step 7: Chill in the Fridge
Refrigerate your cheesecake for at least 4 hours or, for the best results, overnight until it sets perfectly.
Step 8: Decorate and Serve
Before serving, sprinkle additional Oreo cookies and red velvet cake crumbs on top for that extra flair!
Serving Suggestions & Pairings
This cheesecake is incredibly versatile. Pair it with a dollop of fresh whipped cream and a sprinkle of chocolate shavings for a luxurious touch. For a festive look, serve it alongside seasonal fruits like strawberries or a rich chocolate sauce. It pairs beautifully with a cup of coffee or a glass of red wine, making it perfect for dinner parties or special occasions.
Storage & Leftovers Guide
Store any leftover cheesecake tightly wrapped in the refrigerator for up to 5 days. If you want to keep it longer, consider freezing the cheesecake pieces. Wrap them individually in plastic wrap, then place them in an airtight container—frozen, they can last for up to 3 months!
Kitchen Wisdom & Success Tips
- Make sure your cream cheese is softened for easy blending; this helps avoid lumps in your cheesecake.
- Don’t skip the chilling time—it allows the flavors to meld and the cheesecake to firm up nicely.
- If you face any stubborn sticking, running a knife around the edge of the springform pan before releasing can help.
Flavor Variations & Adaptations
Feeling adventurous? Switch up the crust with crushed graham crackers or vanilla wafers for a different taste. You can also add different flavors to your cheesecake filling, such as almond extract or even a swirl of raspberry sauce for an enticing fruity kick!
Reader Questions & Solutions
-
Can I make this cheesecake ahead of time?
- Absolutely! It can be made a day in advance and stored covered in the fridge.
-
What if I don’t have a springform pan?
- You can use a regular cake pan, but it may require some careful slicing to remove.
-
Can I use homemade whipped cream?
- Yes! Homemade whipped cream is delicious, but ensure it’s stabilizing for best results.
-
What do I do if my cheesecake cracks?
- Don’t worry! A little cool whip or chocolate ganache can cover cracks beautifully.
-
Can I add more Oreos for extra flavor?
- Of course! Feel free to adjust the Oreo content to your liking—more cookies mean more crunch!
Wrapping Up
The Best Red Velvet Oreo Cheesecake isn’t just a dessert; it’s a crowd-pleaser, a conversation starter, and a reason to gather with friends and loved ones. This recipe combines rich flavors and textures that will leave everyone craving more. So grab your apron, gather your ingredients, and let joy fill your kitchen as you create this stunning masterpiece! Can’t wait for you to share your own joyful memories over this delicious cheesecake! Enjoy and happy baking!
PrintRed Velvet Oreo Cheesecake
A stunning dessert combining creamy cheesecake and the rich flavors of red velvet and Oreo cookies, perfect for celebrations.
- Prep Time: 15 minutes
- Cook Time: 20 minutes
- Total Time: 240 minutes
- Yield: 10-12 servings 1x
- Category: Dessert
- Method: Baking
- Cuisine: American
- Diet: Vegetarian
Ingredients
- 2 cups red velvet cake mix
- 1/2 cup unsalted butter, melted
- 1 egg
- 16 oz cream cheese, softened
- 1 cup powdered sugar
- 1 teaspoon vanilla extract
- 2 cups whipped cream
- 1 package Oreo cookies, crushed
- For decoration: additional Oreo cookies and red velvet cake crumbs
Instructions
- Preheat your oven to 350°F (175°C) and grease a 9-inch springform pan.
- In a bowl, mix the red velvet cake mix, melted butter, and egg until well combined, then press into the bottom of the prepared pan to form a crust.
- Bake the crust for 10-12 minutes and let it cool completely.
- Beat the cream cheese until smooth, then add powdered sugar and vanilla extract, mixing until well incorporated.
- Fold in the whipped cream and crushed Oreo cookies until combined.
- Pour the cheesecake mixture over the cooled crust and smooth the top with a spatula.
- Refrigerate for at least 4 hours or overnight until set.
- Before serving, decorate with additional Oreo cookies and red velvet cake crumbs.
Notes
Ensure cream cheese is softened for easy mixing and allow adequate chilling time for best results.
Nutrition
- Serving Size: 1 serving
- Calories: 335
- Sugar: 17g
- Sodium: 210mg
- Fat: 21g
- Saturated Fat: 12g
- Unsaturated Fat: 7g
- Trans Fat: 0g
- Carbohydrates: 34g
- Fiber: 0g
- Protein: 4g
- Cholesterol: 30mg


