
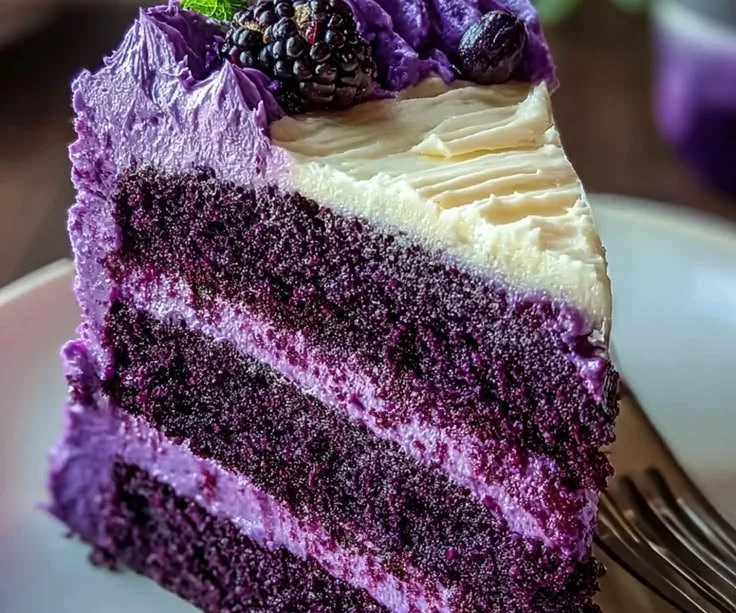
As I sifted through my pantry, I stumbled upon a bottle of purple food coloring, remnants from a previous culinary adventure. Intrigued by its vibrant hue and potential, I felt an irresistible urge to create something unique and delightful. The idea of a cake spun in my mind—the kind that marries a classic velvet texture with the richness of chocolate, all dressed in a stunning purple attire. And thus, the journey to craft a Moist Purple Velvet Cake Blended With Rich Chocolate Cream began—one that not only tempts the taste buds but also adds a splash of whimsy to any gathering.
Recipe Timing
- Prep Duration: 20 minutes
- Active Cooking: 35 minutes
- Total Duration: 55 minutes
- Portion Size: 8 servings
- Complexity: Moderate
Nutritional Recipe
- Calories per portion: 450
- Protein: 4g per serving
- Carbs: 47g per serving
- Fats: 27g per serving
- Fiber: 1g per serving
- Sugars: 23g per serving
- Sodium: 320mg per serving
Why You’ll Love This Moist Purple Velvet Cake Blended With Rich Chocolate Cream Ideas
This cake isn’t just a visual delight with its deep purple color; it’s also a wonder for the taste buds. The moist, velvety texture combined with the rich chocolate flavor will elevate any celebration, making it perfect for birthdays, anniversaries, or even just a special Tuesday evening. The fluffy whipped cream frosting complements the cake perfectly, creating a balance between sweetness and decadence. It’s a showstopper that invites curious smiles and eager forks to your table!
The Complete Cooking Journey
Baking this cake is not just about following steps; it’s about embracing the joy of creating something beautiful and delicious from scratch. As the aroma of baked chocolate fills your kitchen, you’ll find yourself lost in memories of cherished moments spent with friends and family over slices of cake, laughter, and love. Each forkful is a reminder of how simple ingredients can weave together into something extraordinary.
Ingredients:
- 2 cups all-purpose flour
- 1 1/2 cups granulated sugar
- 1/2 cup unsweetened cocoa powder
- 1 teaspoon baking soda
- 1/2 teaspoon baking powder
- 1/2 teaspoon salt
- 1 cup vegetable oil
- 1 cup buttermilk
- 2 large eggs
- 1 teaspoon vanilla extract
- 1 tablespoon purple food coloring
- 1 1/2 cups heavy cream
- 1/2 cup powdered sugar
Method:
Step 1: Preheat Your Oven
Preheat your oven to 350°F (175°C) and grease two 9-inch round cake pans.
Step 2: Combine Dry Ingredients
In a large bowl, whisk together flour, sugar, cocoa powder, baking soda, baking powder, and salt until fully mixed.
Step 3: Mix Wet Ingredients
In another bowl, mix oil, buttermilk, eggs, vanilla, and purple food coloring until well combined.
Step 4: Blend Together
Gradually add wet ingredients to the dry mixture, mixing until the batter is smooth and luscious.
Step 5: Bake the Cakes
Divide the batter evenly between the prepared cake pans and bake for 30-35 minutes or until a toothpick comes out clean.
Step 6: Cool the Cakes
Allow cakes to cool in the pans for 10 minutes, then carefully transfer to a wire rack to cool completely.
Step 7: Prepare the Frosting
For the frosting, whip the heavy cream and powdered sugar until soft peaks form.
Step 8: Assemble the Cake
Once the cakes are completely cooled, spread a layer of frosting between the cakes and generously coat the top and sides.
Step 9: Serve and Enjoy
Slice into your beautiful creation, serve, and revel in the deliciousness of your Purple Velvet Cake!
Serving Suggestions & Pairings
This show-stopping cake pairs perfectly with a warm cup of coffee or a refreshing glass of milk. For a vibrant twist, try serving it alongside fresh berries or a scoop of vanilla ice cream. Don’t forget to sprinkle some edible glitter or decorative sprinkles on top to add a festive flair!
Storage & Leftovers Guide
To keep your cake fresh, store it in an airtight container at room temperature for up to 3 days. If you have leftovers, you can refrigerate them for up to a week, although I’ll be surprised if any slice survives that long!
Kitchen Wisdom & Success Tips
- Make sure to use fresh baking soda and baking powder for best results.
- If your buttermilk is homemade (using milk and vinegar), let it sit for about 10 minutes for optimal results.
- Allow the cakes to cool completely before frosting to avoid melting your whipped cream!
Flavor Variations & Adaptations
Feeling adventurous? Add a hint of almond extract for a unique twist or mix in some chocolate chips into the batter for an extra chocolatey bite. For a lighter version, you can substitute the heavy cream with Greek yogurt for the frosting.
Reader Questions & Solutions
- Can I use regular food coloring instead of purple? Absolutely! Just keep an eye on the dosage for desired color.
- What if I don’t have buttermilk? You can mix regular milk with a teaspoon of vinegar and let it sit for 10 minutes.
- How do I fix a dry cake? If your cake turns out dry, brush it with a simple syrup (equal parts water and sugar boiled together) after cooling.
- Can I freeze the cake? Yes! Wrap the individual layers in plastic wrap and foil, then store in the freezer for up to 3 months.
- How do I make the frosting stiffer? Add more powdered sugar until the desired consistency is reached.
Wrapping Up
Creating this Moist Purple Velvet Cake Blended With Rich Chocolate Cream is more than just a recipe; it’s an experience. Each step brings you closer to a dessert that’s not just stunning but also filled with love and joy. Gather your ingredients, roll up your sleeves, and dive into this delightful adventure. Your kitchen will be filled with laughter, rich aromas, and a cake that promises to bring everyone together. Happy baking!
PrintMoist Purple Velvet Cake Blended With Rich Chocolate Cream
A stunning purple velvet cake that combines a classic texture with rich chocolate flavor, perfect for any celebration.
- Prep Time: 20 minutes
- Cook Time: 35 minutes
- Total Time: 55 minutes
- Yield: 8 servings 1x
- Category: Dessert
- Method: Baking
- Cuisine: American
- Diet: Vegetarian
Ingredients
- 2 cups all-purpose flour
- 1 1/2 cups granulated sugar
- 1/2 cup unsweetened cocoa powder
- 1 teaspoon baking soda
- 1/2 teaspoon baking powder
- 1/2 teaspoon salt
- 1 cup vegetable oil
- 1 cup buttermilk
- 2 large eggs
- 1 teaspoon vanilla extract
- 1 tablespoon purple food coloring
- 1 1/2 cups heavy cream
- 1/2 cup powdered sugar
Instructions
- Preheat your oven to 350°F (175°C) and grease two 9-inch round cake pans.
- In a large bowl, whisk together flour, sugar, cocoa powder, baking soda, baking powder, and salt until fully mixed.
- In another bowl, mix oil, buttermilk, eggs, vanilla, and purple food coloring until well combined.
- Gradually add wet ingredients to the dry mixture, mixing until the batter is smooth and luscious.
- Divide the batter evenly between the prepared cake pans and bake for 30-35 minutes or until a toothpick comes out clean.
- Allow cakes to cool in the pans for 10 minutes, then carefully transfer to a wire rack to cool completely.
- For the frosting, whip the heavy cream and powdered sugar until soft peaks form.
- Once the cakes are completely cooled, spread a layer of frosting between the cakes and generously coat the top and sides.
- Slice into your beautiful creation, serve, and revel in the deliciousness of your Purple Velvet Cake!
Notes
Store the cake in an airtight container at room temperature for up to 3 days or refrigerate for up to a week.
Nutrition
- Serving Size: 1 serving
- Calories: 450
- Sugar: 23g
- Sodium: 320mg
- Fat: 27g
- Saturated Fat: 15g
- Unsaturated Fat: 12g
- Trans Fat: 0g
- Carbohydrates: 47g
- Fiber: 1g
- Protein: 4g
- Cholesterol: 60mg