
When I think of sweet indulgence, nothing beats the iconic Oreo. Those simple yet impactful sandwiches of chocolate cookies and creamy filling have a way of sealing memories, from childhood cravings to delightful desserts shared among friends. Today, I want to share a personal favorite — Oreo Balls. These bite-sized delights manage to pack all the nostalgia of the classic cookie into a truffle-like treat that’s as easy to make as it is irresistibly delicious. Trust me, one bite, and you’ll be hooked!
Recipe Timing
- Prep Duration: 20 minutes
- Active Cooking: 10 minutes
- Total Duration: 50 minutes, including chilling time
- Portion Size: Makes about 30 Oreo balls
- Complexity: Simple
Nutritional Recipe
- Calories per portion: Approximately 110
- Protein: 1.5 grams
- Carbs: 14 grams
- Fats: 6 grams
- Fiber: 0.5 grams
- Sugars: 8 grams
- Sodium: 50 mg
Why You’ll Love This Oreo Balls Recipe
Oreo Balls are the perfect blend of simplicity and flavor. They come together in a snap, require minimal ingredients, and cater to both chocolate lovers and those with gluten sensitivities. Plus, these decadent treats are perfect for parties, holidays, or just a cozy night in. There’s something utterly satisfying about crafting these tasty bites that makes them a rewarding experience, whether you’re an experienced baker or a novice in the kitchen.
The Complete Cooking Journey
Picture this: It’s Sunday afternoon; the sun is shining through your kitchen window as you decide to whip up something special. You dive into your pantry and pull out some Oreos, butter, and chocolate. Within no time, your kitchen is filled with the delightful aroma of melted chocolate and a sweet indulgence that’s beautifully wrapped in nostalgia. These Oreo Balls are truly a celebration of flavors and memories waiting to unfold with each crafted bite.
Ingredients:
- 30 (340g) regular or gluten-free Oreo cookies
- 3 tablespoons (45g) unsalted butter, melted and cooled
- 2-5 tablespoons whole milk
- 8 ounces (225g) dark, semi-sweet, or white chocolate, chopped
- 1 teaspoon vegetable oil (optional)
Method:
Step 1: Prepare Your Surface
Line a medium-sized baking sheet or cutting board with parchment paper and set aside.
Step 2: Grind the Oreos
In the bowl of a large food processor, add in the Oreos (WITH the filling). Grind until the Oreos become very fine and crumbly.
Step 3: Combine Crumbs with Butter
Add your melted butter and 2 tablespoons of milk to the Oreo crumbs. Pulse the mixture until it’s well moistened and sticks together without crumbling. If needed, pulse in more milk, 1 tablespoon at a time, until the mixture comes together.
Step 4: Shape the Oreo Balls
Scoop out 1 tablespoon-sized portions and roll between your hands into a smooth ball. Arrange on your parchment-lined baking sheet.
Step 5: Adjust Consistency if Needed
If you find the mixture is too crumbly to roll, blend in some more milk and try again. If you accidentally add too much milk and the mixture is too sticky to roll, scoop out the portions and drop them onto your baking sheet, then chill in the freezer for 5-10 minutes or until firm enough to roll smoothly.
Step 6: Chill the Oreo Balls
Place the Oreo balls in the freezer to chill for at least 15 minutes or until solid before dipping in chocolate.
Step 7: Melt the Chocolate
Melt chocolate in your microwave or on the stove over a double boiler. To melt in your microwave, place the chopped chocolate in a microwave-safe bowl and heat in 10-second bursts, stirring after each one until melted and smooth. To melt on your stovetop, fill a pot with 1 inch of water, bring to a simmer, reduce the heat, and place the chocolate in a heat-safe bowl over the pot until melted.
Step 8: (Optional) Add Oil to Chocolate
If using, mix oil into the melted chocolate and set aside for 5 minutes to cool slightly. If the chocolate is too hot, it can melt the Oreo balls!
Step 9: Dip the Oreo Balls
Drop one Oreo ball into the melted chocolate and quickly toss to coat. Use a fork or chocolate dipping utensil to lift the ball up and gently shake over the bowl to allow the excess chocolate to drip off.
Step 10: Return to Parchment
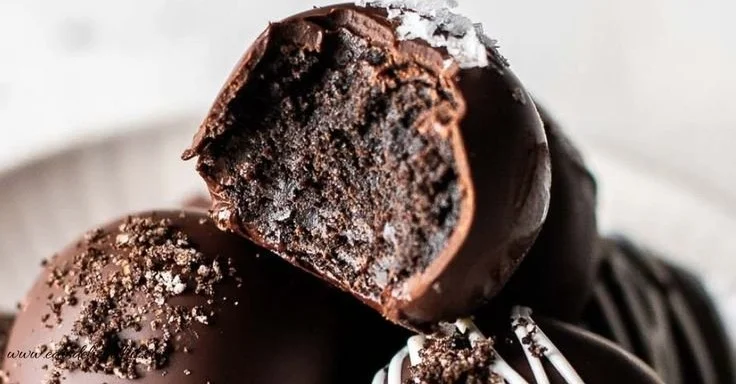
Place the chocolate-dipped Oreo ball back onto your parchment-lined baking sheet. Leave the truffles plain, or top with some flaky sea salt or crushed Oreo crumbs while the chocolate is still wet. You can also drizzle the tops with white chocolate after the coating has firmed up. Repeat with the remaining truffles.
Step 11: Set the Chocolate
Chill the Oreo balls in the fridge or freezer until the outside chocolate layer is set. Keep stored in the fridge until ready to serve!
Serving Suggestions & Pairings
These Oreo Balls are delightful on their own, but they shine most when paired with a glass of cold milk, a scoop of vanilla ice cream, or even a cup of coffee. Consider serving them at gatherings with a variety of other desserts, or wrap them up nicely for gifts during the holiday season.
Storage & Leftovers Guide
Store your Oreo Balls in an airtight container in the fridge for up to 2 weeks. You can also freeze them for up to 3 months. Just make sure to separate layers with parchment paper to prevent sticking!
Kitchen Wisdom & Success Tips
- Make sure the melted chocolate isn’t too hot before dipping; this prevents the Oreo balls from melting away into the chocolate.
- If you don’t have a food processor, you can crush the Oreos inside a zip-top bag using a rolling pin—fun and a little workout!
Flavor Variations & Adaptations
Feel free to experiment! You can use different varieties of Oreos, such as lemon, peanut butter, or red velvet. For a twist, add some mini chocolate chips or nuts into the filling, or use white chocolate for a sweet contrast.
Reader Questions & Solutions
-
How do I prevent the chocolate from hardening too quickly?
Melt the chocolate over low heat, and keep stirring to prevent it from cooling off too soon. -
Can I use dairy-free chocolate?
Absolutely! Just swap regular chocolate with dairy-free or vegan chocolate for a delicious alternative. -
What if my Oreo balls are too dry?
Just blend in more milk to the crumb mixture until it reaches the right consistency to roll. -
Can I make these in advance for a party?
Yes! You can make these a few days ahead and store them in the fridge until you’re ready to serve. -
How can I make these more visually appealing?
Try using colorful sprinkles on top or drizzle different types of chocolate for a fun design.
Wrapping Up
So, what are you waiting for? Grab those Oreos, bring a bit of joy into your kitchen, and create these delightful Oreo Balls! Whether it’s a treat for yourself or a gift for friends, these truffles are sure to bring smiles all around. Happy baking and enjoy every chocolaty bite!
PrintOreo Balls

Delicious truffle-like treats that capture the nostalgia of classic Oreo cookies, perfect for any occasion.
- Prep Time: 20 minutes
- Cook Time: 10 minutes
- Total Time: 50 minutes
- Yield: 30 Oreo balls 1x
- Category: Dessert
- Method: Chilling and Dipping
- Cuisine: American
- Diet: Vegetarian
Ingredients
- 30 (340g) regular or gluten-free Oreo cookies
- 3 tablespoons (45g) unsalted butter, melted and cooled
- 2–5 tablespoons whole milk
- 8 ounces (225g) dark, semi-sweet, or white chocolate, chopped
- 1 teaspoon vegetable oil (optional)
Instructions
- Prepare your surface: Line a medium-sized baking sheet or cutting board with parchment paper and set aside.
- Grind the Oreos: In the bowl of a large food processor, add in the Oreos (WITH the filling). Grind until the Oreos become very fine and crumbly.
- Combine crumbs with butter: Add your melted butter and 2 tablespoons of milk to the Oreo crumbs. Pulse the mixture until it’s well moistened and sticks together without crumbling. If needed, pulse in more milk, 1 tablespoon at a time, until the mixture comes together.
- Shape the Oreo balls: Scoop out 1 tablespoon-sized portions and roll between your hands into a smooth ball. Arrange on your parchment-lined baking sheet.
- Adjust consistency if needed: If you find the mixture is too crumbly to roll, blend in some more milk and try again. If you accidentally add too much milk and the mixture is too sticky to roll, scoop out the portions and drop them onto your baking sheet, then chill in the freezer for 5-10 minutes or until firm enough to roll smoothly.
- Chill the Oreo balls: Place the Oreo balls in the freezer to chill for at least 15 minutes or until solid before dipping in chocolate.
- Melt the chocolate: Melt chocolate in your microwave or on the stove over a double boiler. To melt in your microwave, place the chopped chocolate in a microwave-safe bowl and heat in 10-second bursts, stirring after each one until melted and smooth. To melt on your stovetop, fill a pot with 1 inch of water, bring to a simmer, reduce the heat, and place the chocolate in a heat-safe bowl over the pot until melted.
- Add oil to chocolate (optional): If using, mix oil into the melted chocolate and set aside for 5 minutes to cool slightly. If the chocolate is too hot, it can melt the Oreo balls!
- Dip the Oreo balls: Drop one Oreo ball into the melted chocolate and quickly toss to coat. Use a fork or chocolate dipping utensil to lift the ball up and gently shake over the bowl to allow the excess chocolate to drip off.
- Return to parchment: Place the chocolate-dipped Oreo ball back onto your parchment-lined baking sheet. Leave the truffles plain, or top with some flaky sea salt or crushed Oreo crumbs while the chocolate is still wet. You can also drizzle the tops with white chocolate after the coating has firmed up. Repeat with the remaining truffles.
- Set the chocolate: Chill the Oreo balls in the fridge or freezer until the outside chocolate layer is set. Keep stored in the fridge until ready to serve!
Notes
Store in an airtight container in the fridge for up to 2 weeks or freeze for up to 3 months, separated by parchment paper.
Nutrition
- Serving Size: 1 ball
- Calories: 110
- Sugar: 8g
- Sodium: 50mg
- Fat: 6g
- Saturated Fat: 3g
- Unsaturated Fat: 2g
- Trans Fat: 0g
- Carbohydrates: 14g
- Fiber: 0.5g
- Protein: 1.5g
- Cholesterol: 15mg


