
When I think of summer, the vibrant warmth of the sun and the sweet, tropical aroma of ripe mangoes come to mind. One of my favorite ways to enjoy this juicy fruit is by transforming it into delightful mango mochi. This simple yet exquisite dessert encapsulates the essence of summer, blending the chewy texture of mochi with the refreshing burst of mango. It holds a special place in my heart because it reminds me of sunny afternoons spent at my grandmother’s home, where she would whip up sweet treats in her tiny kitchen, engulfed by the smell of mangoes and sugar.
## Recipe Timing
- Prep Duration: 15 minutes
- Active Cooking: 3 minutes
- Total Duration: 18 minutes
- Portion Size: Serves 4
- Complexity: Simple
## Nutritional Recipe
- Calories per portion: 148
- Protein: 1g per serving
- Carbs: 34g per serving
- Fats: 0.3g per serving
- Fiber: 1g per serving
- Sugars: 13g per serving
- Sodium: 5mg per serving
## Why You’ll Love This Mango Mochi
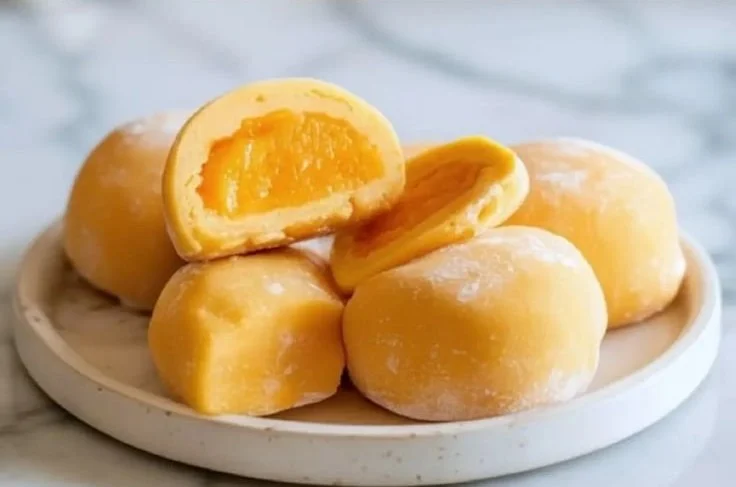
This Mango Mochi is a delightful introduction to the world of Asian desserts. The combination of sweet rice flour creates a lovely chewy texture, almost like a little hug for your taste buds. Tucked inside each mochi is a piece of sweet, ripe mango that adds a burst of flavor and juiciness. Plus, the beauty of this treat is that it’s incredibly easy to make, calling for just a handful of ingredients. Whether you serve it at a summer picnic or as a sweet finish to a cozy dinner at home, this dessert will undoubtedly impress both family and friends.
## The Complete Cooking Journey
## Ingredients:
- 1 cup sweet rice flour (mochi flour)
- 1/4 cup sugar
- 1/2 cup water
- 1 ripe mango, diced
- Cornstarch for dusting
## Method:
Step 1: Combine Ingredients
In a bowl, mix the sweet rice flour and sugar until evenly combined, creating a sweet base for your mochi.
Step 2: Add Water
Gradually add water while stirring the mixture until it becomes smooth and lump-free. This ensures a perfect, chewy texture that you’ll love.
Step 3: Prepare for Microwaving
Pour the smooth mixture into a microwave-safe dish, ensuring it’s spread evenly. This will help with even cooking.
Step 4: Microwave the Mixture
Cover the dish with plastic wrap, leaving a small vent for steam to escape, and microwave for about 1 minute.
Step 5: Stir and Heat Again
Remove from the microwave carefully, stir the mixture, then microwave for another minute. This two-step process ensures that your mochi cooks thoroughly and develops that desirable chewiness.
Step 6: Cool the Mochi
Let it cool slightly. While doing this, prepare a clean surface dusted with cornstarch to prevent sticking.
Step 7: Knead the Dough
Turn the mochi onto the dusted surface and knead gently. Just a few moments of kneading will help develop its texture.
Step 8: Portion the Mochi
Divide the mochi into pieces, about the size of a golf ball, and flatten each piece. This will create the perfect pocket for your mango.
Step 9: Add the Mango
Place a piece of diced mango in the center of each flattened mochi. The freshness of the mango perfectly complements the soft mochi.
Step 10: Shape and Serve
Fold the mochi over the mango, shape it into a ball, and dust with more cornstarch. Your mango mochi is now ready to serve! Enjoy it chilled or at room temperature for a refreshing treat.
## Serving Suggestions & Pairings
Mango mochi is a versatile dessert that pairs beautifully with a variety of other flavors. Consider serving it alongside coconut ice cream for an extra creamy complement or drizzle with honey for added sweetness. Fresh mint can also add a lovely, aromatic touch, making every bite a little more special.
## Storage & Leftovers Guide
Mango mochi can be stored in an airtight container in the refrigerator for up to 3 days. Ensure they are dusted with cornstarch before storing to prevent sticking. You can also freeze the mochi for up to a month. Just remember to thaw them in the fridge before serving for the best texture.
## Kitchen Wisdom & Success Tips
- Texture Tip: Make sure to stir the batter well to eliminate any lumps, ensuring an even texture throughout.
- Mango Selection: Choose a ripe mango that gives slightly to pressure—this means it’s perfectly sweet and juicy!
- Microwave Warning: Depending on your microwave’s wattage, you might need to adjust the cooking time slightly. Just keep an eye on it to prevent overcooking.
## Flavor Variations & Adaptations
While mango is delightful, you can experiment with other fillings! Customize your mochi with strawberries, blueberries, or even a scoop of sweetened red bean paste for a unique twist. Feel free to play around with colors as well—add a few drops of natural food color to your mochi dough to create a visually stunning dessert.
## Reader Questions & Solutions
-
Can I use regular rice flour instead of sweet rice flour?
Regular rice flour won’t yield the same chewy texture. Sweet rice flour is essential for that classic mochi feel. -
How can I prevent the mochi from sticking?
Always dust your hands and the work surface with cornstarch to avoid sticking. -
Can I make this recipe vegan?
Yes, this recipe is naturally vegan since it doesn’t require dairy or eggs, making it accessible for everyone to enjoy! -
What if I don’t have a microwave?
You can steam the mixture over boiling water in a heatproof dish instead of microwaving it, stirring frequently until it becomes thick and sticky. -
Can I add flavoring to the mochi dough?
Absolutely! Adding a splash of vanilla extract, coconut milk, or even citrus zest can elevate the flavors significantly.
## Wrapping Up
Creating mango mochi is like capturing a piece of summer in a delightful little ball. With its soft, chewy texture and sweet, fruity center, this dessert not only tickles the taste buds but also warms the heart. Remember, cooking is not just about following a recipe; it’s about enjoying the process, sharing joy, and making memories. So gather your ingredients, channel your inner chef, and delight in the beauty of this tropical treat. Happy cooking!
PrintMango Mochi
A simple and delightful dessert combining the chewy texture of mochi with sweet, ripe mango.
- Prep Time: 15 minutes
- Cook Time: 3 minutes
- Total Time: 18 minutes
- Yield: 4 servings 1x
- Category: Dessert
- Method: Microwaving
- Cuisine: Asian
- Diet: Vegan
Ingredients
- 1 cup sweet rice flour (mochi flour)
- 1/4 cup sugar
- 1/2 cup water
- 1 ripe mango, diced
- Cornstarch for dusting
Instructions
- Combine Ingredients: In a bowl, mix the sweet rice flour and sugar until evenly combined, creating a sweet base for your mochi.
- Add Water: Gradually add water while stirring the mixture until it becomes smooth and lump-free.
- Prepare for Microwaving: Pour the smooth mixture into a microwave-safe dish, ensuring it’s spread evenly.
- Microwave the Mixture: Cover the dish with plastic wrap, leaving a small vent for steam to escape, and microwave for about 1 minute.
- Stir and Heat Again: Remove from the microwave carefully, stir the mixture, then microwave for another minute.
- Cool the Mochi: Let it cool slightly. Prepare a clean surface dusted with cornstarch.
- Knead the Dough: Turn the mochi onto the dusted surface and knead gently.
- Portion the Mochi: Divide the mochi into pieces, about the size of a golf ball, and flatten each piece.
- Add the Mango: Place a piece of diced mango in the center of each flattened mochi.
- Shape and Serve: Fold the mochi over the mango, shape it into a ball, and dust with more cornstarch.
Notes
For optimal texture, store in an airtight container dusted with cornstarch. Can be frozen for up to a month.
Nutrition
- Serving Size: 1 serving
- Calories: 148
- Sugar: 13g
- Sodium: 5mg
- Fat: 0.3g
- Saturated Fat: 0g
- Unsaturated Fat: 0g
- Trans Fat: 0g
- Carbohydrates: 34g
- Fiber: 1g
- Protein: 1g
- Cholesterol: 0mg


