
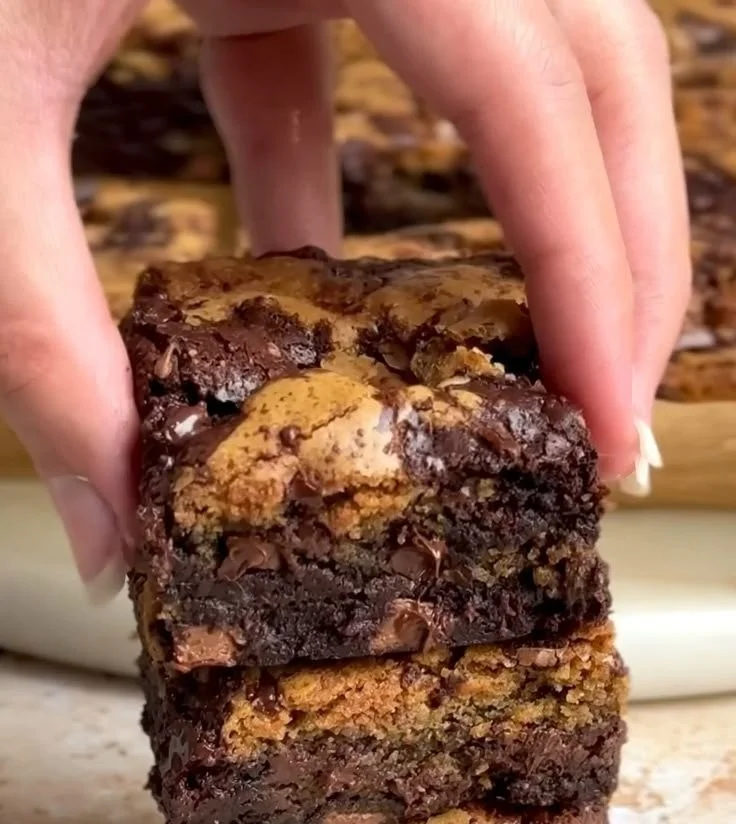
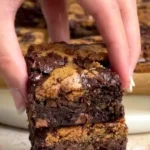
As I wandered through my neighborhood farmers market one Saturday morning, the sweet aroma of freshly baked goods wafted through the air, pulling me toward a cozy little stall nestled between vibrant crates of vegetables. There it was: a plate heaped high with beautiful brownies, bubbling with rich chocolate, intermingled with the chewy goodness of cookies. It was a classic case of “you can’t have one without the other,” and I was inspired. This delightful moment brought back cherished memories of baking with my grandmother in her sunny kitchen, where we would blend sweet chocolate with soft, buttery dough. That day, I decided it was time to recreate a treat that captured the very essence of those childhood baking adventures—the Brown Butter Brookie. It’s a harmonious blend of cookie and brownie that promises to fill your home with warmth and buttery goodness.
Recipe Timing
- Prep Duration: 15 minutes
- Active Cooking: 30 minutes
- Total Duration: 45 minutes
- Portion Size: 12-16 servings
- Complexity: Simple
Nutritional Recipe
- Calories per portion: Approximately 250
- Protein: 3 grams
- Carbs: 35 grams
- Fats: 13 grams
- Fiber: 1 gram
- Sugars: 20 grams
- Sodium: 150 mg
Why You’ll Love This Brown Butter Brookies
These Brown Butter Brookies are the best of both worlds; the crispy edges and gooey brownie center created by the decadent brown butter is irresistible. Each bite is packed with rich chocolate chips and a chewy cookie crust that’ll make your heart sing! Brown butter adds an incredible nutty flavor that elevates these bars beyond your typical dessert. Sharing them with friends and family is a guarantee for smiles and seconds—you might even end up being the star of the next potluck.
The Complete Cooking Journey
Now, let’s embark on this delightful baking expedition! Follow my lead as we melt butter, mix some ingredients, and create a decadent dessert that’ll have everyone swooning. You’ll be savoring the blend of crispy cookies and fudgy brownie in no time!
Ingredients:
- 1 cup unsalted butter
- 1 cup brown sugar
- 1/2 cup granulated sugar
- 2 large eggs
- 1 teaspoon vanilla extract
- 2 cups all-purpose flour
- 1/2 teaspoon baking powder
- 1/2 teaspoon baking soda
- 1/2 teaspoon salt
- 1 cup chocolate chips
Method:
Step 1: Preheat the Oven
Preheat your oven to 350°F (175°C) and grease a 9×13 inch baking pan. This ensures that your ultimate treat won’t stick, allowing for easy removal and pretty squares!
Step 2: Melt the Butter
In a saucepan over medium heat, melt the butter until it turns a beautiful golden brown color. Keep an eye on it as it cooks, letting the nutty aroma fill your kitchen. Allow it to cool slightly before using; this is where the magic begins!
Step 3: Combine the Sugars
In a mixing bowl, combine the brown butter, brown sugar, and granulated sugar. Mix until you achieve a smooth, luscious mixture that looks like pure bliss!
Step 4: Add Eggs and Vanilla
Beat in the eggs and vanilla extract. This wonderful combination brings richness and depth to your batter—every swirl is a promise of delight.
Step 5: Prepare the Dry Ingredients
In another bowl, whisk together the flour, baking powder, baking soda, and salt. This is where the structure of your bars forms, so make sure they’re well mixed.
Step 6: Bring It Together
Gradually add the dry ingredients to the wet ingredients, mixing until just combined. Over-mixing will make your brookies tough, and we’re going for melt-in-your-mouth goodness.
Step 7: Fold in Chocolate Chips
Gently fold in the chocolate chips, allowing them to scatter throughout the batter. Chocolate makes everything better!
Step 8: Pour the Cookie Layer
Pour half of the cookie batter into the prepared pan and smooth it out evenly, beginning our layering journey.
Step 9: Dollop with Brownie Batter
Add dollops of brownie batter (whether using a mix or homemade) over the cookie layer. It feels like painting with chocolate!
Step 10: Top with Remaining Dough
Spoon the remaining cookie dough over the brownie layer, covering it lovingly. Don’t worry about perfect coverage—this is just the beginning of the delicious swirl.
Step 11: Create a Marbled Effect
Gently swirl with a knife to create a marbled effect. This is where artistry meets baking!
Step 12: Bake to Perfection
Bake for 25-30 minutes or until a toothpick comes out clean. The loftiness of the brookies will invite you to devour them warm!
Step 13: Let Cool and Serve
Allow it to cool before cutting into squares and serving. Trust me; the anticipation will be worth every minute.
Serving Suggestions & Pairings
Enjoy your Brown Butter Brookies warm from the oven with a scoop of vanilla ice cream, drizzled with caramel sauce, or alongside a steaming cup of coffee or tea. They also pair delightfully with fresh berries!
Storage & Leftovers Guide
Store your brookies in an airtight container at room temperature for up to 3 days. You can also keep them in the fridge for a week, or freeze them for up to 3 months. Just make sure to wrap them well!
Kitchen Wisdom & Success Tips
- To enhance the flavor, add a pinch of espresso powder to your brownie batter!
- Use good quality chocolate chips; they make a significant difference in taste.
- If you have extra brownie batter, bake it in mini muffin tins for tasty bites.
Flavor Variations & Adaptations
Feel free to experiment! Swap in nuts, add a swirl of peanut butter, or toss in some dried fruit for a unique twist. Gluten-free flour can also be used as a substitute for a gluten-free treat!
Reader Questions & Solutions
-
Can I use margarine instead of butter?
While you can, I highly recommend using real butter for the best flavor and texture. -
What should I do if my batter is too thick?
A splash of milk or water can add the perfect moisture to get the right consistency. -
Can I make the dough ahead of time?
Definitely! You can prepare the batter and store it in the fridge for a day before baking. -
Why did my brookies turn out dry?
Most likely, they were overbaked or mixed too much. Ensure you watch them closely in the oven! -
How can I get the brownie layer more fudgy?
For extra fudginess, reduce the baking time by a couple of minutes!
Wrapping Up
Baking Brown Butter Brookies is not just a recipe; it’s about reliving cherished memories and sharing joy with those you love. Each bite carries a story, filled with warmth and the satisfaction of homemade goodies. So, roll up your sleeves, gather your ingredients, and let this sweet adventure fill your home with laughter and deliciousness! You’ve got this!
PrintBrown Butter Brookies
A delightful blend of cookie and brownie, packed with rich chocolate and a nutty flavor from brown butter.
- Prep Time: 15 minutes
- Cook Time: 30 minutes
- Total Time: 45 minutes
- Yield: 12-16 servings 1x
- Category: Dessert
- Method: Baking
- Cuisine: American
- Diet: Vegetarian
Ingredients
- 1 cup unsalted butter
- 1 cup brown sugar
- 1/2 cup granulated sugar
- 2 large eggs
- 1 teaspoon vanilla extract
- 2 cups all-purpose flour
- 1/2 teaspoon baking powder
- 1/2 teaspoon baking soda
- 1/2 teaspoon salt
- 1 cup chocolate chips
Instructions
- Preheat your oven to 350°F (175°C) and grease a 9×13 inch baking pan.
- Melt the butter in a saucepan over medium heat until golden brown.
- Combine the brown butter, brown sugar, and granulated sugar in a mixing bowl.
- Beat in the eggs and vanilla extract.
- Whisk together the flour, baking powder, baking soda, and salt in another bowl.
- Add the dry ingredients to the wet ingredients, mixing until just combined.
- Fold in the chocolate chips.
- Pour half of the cookie batter into the prepared pan and smooth it out.
- Add dollops of brownie batter over the cookie layer.
- Spoon the remaining cookie dough over the brownie layer.
- Swirl gently with a knife to create a marbled effect.
- Bake for 25-30 minutes or until a toothpick comes out clean.
- Allow to cool before cutting into squares and serving.
Notes
Store in airtight container at room temperature for up to 3 days or freeze for up to 3 months. For extra flavor, add espresso powder to the batter.
Nutrition
- Serving Size: 1 serving
- Calories: 250
- Sugar: 20g
- Sodium: 150mg
- Fat: 13g
- Saturated Fat: 8g
- Unsaturated Fat: 5g
- Trans Fat: 0g
- Carbohydrates: 35g
- Fiber: 1g
- Protein: 3g
- Cholesterol: 0mg


